DIY canopy between houses. Types of canopies over the porch. Why do people choose polycarbonate
If initially in the project you did not provide for a veranda or terrace, a very convenient thing, and in a hot climate simply necessary, then you may well fill this gap by building an additional canopy for the house. With modern construction technology and the availability of materials, you can completely cope with the task with your own hands. Regardless of whether you use metal beams or wooden sheathing for the improvised one.
Canopy for the house
At least in constructive terms, everyone canopy for the house very similar to all others, but still, before construction, it is customary to distinguish them according to their future functional purpose; both the arrangement of the foundation and the calculated strength of all supports depend on this. The need to cover a certain area with a roof arises when you plan to make a summer kitchen next to the house, an additional fully glazed gazebo for autumn-spring tea parties. Or maybe you want to protect your car parked outside from rain and snow, or you want to protect the porch and front door area. A canopy may be needed even when the living room on the first floor is located on the sunny side of the house and gets very hot during the day. It is the canopy, like the visor of a hat, that helps solve this problem and improve the microclimate in the room.
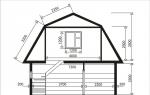
Before building, you will need to visualize your project, enter the building into . We are not talking about using special computer programs; such a visualization can simply be drawn with colored pencils, but this technique will allow you to most clearly determine not only the dimensions, but also the material that you will use for construction.

Shed adjacent to the house, can be made of several basic materials: metal, wood or brick (we are talking about brick supports on which the flooring is already installed). If we talked about this topic 15-20 years ago, then almost every craftsman would have advised making a metal welded structure, covering the roof with corrugated sheets or tiles. Today, new favorites are emerging among building materials, which have won a large segment of the market for such buildings. We are talking about transparent polycarbonate, which is many times stronger than glass, capable of withstanding heavy loads of precipitation and wind without deforming or cracking, and at the same time transmitting a lot of sunlight. Now every self-respecting builder should know.

Polycarbonate can be bent, making the roof of the most bizarre shapes, plus, its installation is not difficult due to the light weight of the material, it can be processed with a standard set of tools, cut, sawed, drilled. Compared to traditional roofing coverings, polycarbonate has only one drawback - its cost. But, of course, if you do not spend it on construction, but use it for such a necessary and useful task as building a canopy for many years to come, then it will still be better to fork out for it. Just don’t save on it by buying regular polycarbonate, without a special coating that protects the material from ultraviolet rays. Otherwise, after the first season, cloudy spots may appear on the surface and it will become fragile.
Canopy in front of the house
By design canopy in front of the house It can be either installed on permanent supports or cantilevered. If everything is more or less clear with the supports, they are what is most often meant, but the cantilever varieties are more likely referred to as a process, because the console is attached directly to the house. The maximum size of such a canopy is 2 meters, but is this so small, is it possible to cover the porch and front door with a small canopy?

In fact, cantilever structures allow you to get a fairly large terrace for relaxing around the perimeter of the house, especially at that time of day when a two-meter panel or roof additionally receives maximum shade. In addition, today on the market you can find many offers of sliding cantilever structures, which, if necessary, you can extend even further, and after use, remove them to their original dimensions. Just remember that the two-meter limit is not made because the manufacturer is harmful, but for maximum wind protection of the structure. If the canopy is longer, then there is a risk that in a strong wind it will simply be torn out of place, thereby damaging the wall of the house to which it is mounted.

The canopy is large, long and wide, under which a car can hide and the whole family can have a get-together; of course, it cannot have a console design. There is no need to save money; you need to equip strong, permanent supports on which a full-fledged roof will rest, and the junction of the canopy with the residential building is closed when performing roofing work. Of course, the budget for such a building will be much higher, but taking into account the above, you will be able to make your family happy with a useful room for a long time.
Wooden canopy for the house

The design features of a residential building may require special design solutions from you. And if you have done it for a wooden house, then it’s worth doing it anyway wooden canopy for house, although it will be somewhat more expensive and more troublesome to operate. After all, wood, as a material, has that special charm that still has a significant influence on the minds of dacha owners. And if, all other things being equal, you show them the choice of a metal canopy or a wooden one, then the majority will vote for the second option.

The peculiarity of working with wood is that the room is outdoor, which means that the wood will be subject to serious atmospheric loads. Especially if your site is located in a lowland or swampy area, then you will need to additionally process each support that is to be installed according to the project. The construction of a structure is not much different from the process. You need to start with the project, calculate the future weight of all the supports and the roof in order to decide on the foundation and the number of beams.

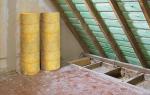
Separately, it is worth mentioning the options for such crafts for the garden, which do not provide a continuous roof on top. Such buildings are built near modern town houses and cottages; due to their light weight, they are not at all difficult to construct and do not require such careful preparation and calculations. Upstairs, on the frame beams (mauerlat), simply lay transverse beams, which will provide quite a lot of shadow downwards. This design came to us from the architectural style of the Mediterranean region, where there is not much rainfall, but in the hot summer you want not only protection from the sun, but also air movement. If you want to get more shade, then it’s easy to cover such a roof with grapes or other climbing plants, or stretch fabric panels on top that can be easily hung up and removed.
Shed adjacent to the house
So, we will assume that the project shed adjacent to the house, you are ready, and you can begin construction work. It is necessary to mark the places for the pits of future supports; their diameter is about 20 centimeters and the depth is 50-60 (in any case, up to dense soil, be guided by your natural conditions). Each such pit is filled with up to a bucket of crushed stone, and then supports are inserted. You can also use special fasteners that are mounted inside the pit, and the beams are already attached to this fastener. The ultimate goal is to concrete supports that are level inside the hole, be it wooden beams or metal pipes. Note that the bars must be treated with special means, antiseptic impregnations, and pipes and profiles should be bought either aluminum or galvanized, which are not subject to rust, but when buying ordinary iron ones, it is better to cover their entire surface with a special primer.

Before equipping the site in the perimeter between the supports, it is worth laying electrical wiring and, if necessary, a water supply and sewerage system. After this, the floor is either filled with concrete screed, or paving slabs, decking boards are laid, or sand and crushed stone are simply poured in (for example, if you are just making a parking space for a car). After the concrete screed has dried, you can begin assembling the main structure.

We should start working on the wall of the building, to which one side of our future canopy will be attached. Special brackets are hung on it, onto which a transverse beam is mounted; it is this beam that will take on all the load-bearing loads of the entire structure. After this, you can start lathing.
Canopy in front of the house

Formation of sheathing canopy in front of the house begins with the formation of the top trim, which will become part of the future roof. At the ends of the supports that we previously installed and concreted, transverse beams are laid, which need to be used to connect all the support pillars into a single system. That is, first the perimeter is connected, and then (depending on the size of the canopy and the number of supports), and then the internal beams are laid parallel to each other. For a metal profile, the connection method is welding, and wooden beams need to be tightened together with special corners. Do not forget to check the evenness of the corners and surfaces using a special level. The weld seams on the profile are processed; they need to be thoroughly cleaned and then covered with a layer of protective paint.

Polycarbonate is cut to the dimensions you need - this is the distance between adjacent beams with a small margin for the seam. But in fact, you can use a sheet of exactly the size that is convenient for you to mount, that is, you can even attach it across a row. Cellular polycarbonate has small cells on one side to remove condensate moisture; make sure that all sheets are positioned with the cells facing down. The sheets are connected to each other using a special H-shaped profile, which will allow the seams to be made neat and airtight, but the material must be fastened into the beams with special self-tapping screws with rubberized thermal washers. You should not connect the sheets very tightly, as the material will expand as the temperature rises. Be sure to leave a certain gap for the compression seam.
The front entrance to a house is an important part of its exterior. must be reliably protected from heavy rain and snowfall. It is this main task that canopies and awnings over the entrance perform. Today the site has prepared for you all the most useful information on the design of the entrance group and practical recommendations for making canopies.
The decorative function of the canopy cannot be denied. Indeed, the canopy frames the entrance, and if you make it attractive and bright, it will attract attention and be a decoration. It is for this reason that it is so important that the style of this element matches the overall architecture of the building.
But this is not the most important purpose of the roof over the entrance. In pouring rain or when you need to close your umbrella, this very visor will be very useful to you. It will protect not only you, but also the door itself.

Canopy or canopy: what's the difference?
Before you decide what you need more: a canopy or a canopy over the porch, you need to answer a few simple questions:
- Where is the porch located: on the front, rear or side of the facade?
- Is it possible to extend the protection from the porch to the entrance to the site, and how necessary is this?
- Which design will fit: arched, straight, gable or some other?
- Which material is most suitable for the construction of the structure in terms of its compliance.
As you understand, the answers to these questions will help you make the right choice between a canopy and a canopy.
What does a canopy look like over a porch?
The canopy protects the porch from precipitation and the sun; it can save your life by becoming a barrier to icicles falling from the roof. The main difference of this design is the direct attachment to the facade.

Fastening to the facade requires special qualities from the visor. It must be light enough to hold firmly on wall fasteners, and at the same time reliable enough to withstand emergency loads from the supply or flow of water. It is important to think about where the water will go from the canopy. The visors look like this:


What is the difference between a canopy over a porch?
A distinctive feature of the canopy is the presence of additional support posts. It may be partially framed by walls. A canopy performs the same tasks as a canopy, only over a larger area. It may include not only the porch area, but also the path to the house, the entrance and, in the fresh air.
If you have the opportunity and need to cover not only the porch, but also part of it with one roof, you need a canopy:


Standards for the arrangement of canopies and canopies
As you probably already understood, any structure above a person’s head, be it a visor or, should ensure complete safety.
First of all, this concerns possible extreme loads. The structure above the porch must withstand the impact of a mass of snow and ice falling from the roof. If the canopy itself is very heavy, for example, forged, and the fastenings to the wall are not reliable enough, it will collapse along with the snowdrift and part of the wall. It is for this reason that SNIP standards dictate that the structure must withstand a minimum of 200 kg/m².

The second important point is fire safety. Entrance group to provide residents with safe evacuation in case of fire in the house.
And the last regulatory recommendation is proper drainage. You are unlikely to like it if water from the awning drains and accumulates in front of the front door. It is not the best option if there is a puddle in front of the porch on the pedestrian street. Typically, water from the porch is drained through a gutter or storm drain. When designing a canopy, you need to immediately think about where to direct the flow.
Popular forms of designs
The size and shape of the roof over the porch depend on the features of the facade and your preferences. There are several popular designs that you will most often find in private cottages:

- flat– such roofs fit organically into facades in modern styles. They may have decoratively designed end parts or have distinctly strict edges;
- domed– this type attracts with its original external design and at the same time takes up little space. For those who are trying to save on materials, this is the best option;
- arched and semi-arched– such canopies and awnings effectively drain water and withstand pressure loads;
- gable- the simplest option with effective drainage. Looks organic on the facades of houses with gable roofs;
- tri-slope– wear-resistant design, suitable for facades of houses with similar roofs;
- concave– used to design original facades.

What can be used to make a porch with a canopy in a private house: photo examples of designs
To decorate the entrance group, you can use almost any building material. Anything is suitable: from polycarbonate to ceramic tiles. The main thing is that the design of the mini-roof matches the style of the facade. Here are a few options with photo examples.
Expensive and elegant forged canopies over the porch
The first thing that comes to mind when we talk about stylish facade decoration is forging. The masterful work of a blacksmith will look great in the frame of the door, both on and on the visor. It’s especially beautiful if it’s all included.
A wrought-iron canopy over the porch looks simply luxurious, and, besides, such products are built to last.

Such work is expensive, but you can make a canopy over the door with your own hands by building a simple frame and welding ready-made forged elements to it, which can be found on sale.
Please note: forged metal has an impressive weight, so it is important to provide sufficiently powerful fasteners for such a canopy or canopy.
In the photo there are canopies and awnings over the entrance made of forging. We’re not talking about prices, such work costs from 20 thousand rubles:


Canopies over the porch and entrance door made of plastic or polycarbonate
Modern lightweight and practical polycarbonate material is used for many designs. With its help you can build and many other important objects. A porch canopy is also on this list. The advantage of polycarbonate is its transparency; it allows some sunlight to pass through, which is very convenient. This material is quite durable, so it can easily withstand significant pressure loads. Polycarbonate does not rot, does not fade, and does not support open fire. Add to all this extraordinary plasticity, and you get the ideal coating for a visor of any shape. Combine it with the same forging and you will get a porch of extraordinary beauty.
Examples of how to make a polycarbonate canopy over a porch:


Plastic is a cheaper analogue of polycarbonate. It is inferior to its brother in aesthetics, but ahead in lightness. Plastic will quickly fade in the sun, so immediately think about whether to use it.
Metal tiles and glass: photos of awnings over the porch in private houses
The metal tile itself weighs a lot, so this type of porch design is not common. The use of this material is justified if the roof of the house is covered with metal tiles and you want to create a single composition.
Such canopies or awnings are highly durable and resistant to all weather conditions. This coating will last a very long time and will look very attractive.
An alternative to a heavy metal canopy over the porch could be. It won't rattle in the rain like metal. The construction of such canopies is simple, and they can be done with your own hands.
Here are some ideas on how to make such canopies over the front door:
Glass in porch design is a rare occurrence. But if your home is designed in a minimalist style, this is logical. Just think again about whether it’s worth using glass if you have small children in your home. And, in any case, use one, which in case of unexpected damage does not crumble into sharp fragments.
Wooden roof over the porch of a private house: photo ideas
Corrugated sheeting for a canopy over the entrance to the house
And our list of popular materials for arranging a porch ends with budget corrugated sheeting. This inexpensive and easy-to-work roofing material is suitable for flat and gable structures. Corrugated sheeting shows good results thanks to a special polymer coating that does not fade for a long time and successfully protects the metal from corrosion. Modern polymers not only have a rich range of colors, but can also imitate wood patterns or masonry.
The sheet is fastened with bolts or bolts and requires a welded frame. It’s easy to make a metal canopy with your own hands. The corrugated sheet is weak for mechanical loads: it can bend under the weight of snow or become deformed during a large hail storm.
Sheds in front of the house are an additional, functional space that allows you to make the most of the site, and comfortably relax in the fresh air in the heat and in bad weather. The building must be ergonomic, reliable, aesthetically pleasing and should not clutter the façade of the building.
Next, we will review original and practical ideas, talk about the design features of extensions, what materials are best used for their manufacture, and provide detailed instructions on how to make a canopy for your house with your own hands.


Design and functionality
The canopy in front of the house should delicately fit into the overall architectural ensemble, emphasize the advantages of the exterior and hide its shortcomings, harmoniously combine with the landscape design of the site, be convenient, practical in use, and fully meet the needs of the owners.
Functional Features
Sheds attached to the house, see photo examples in the gallery, can be attached for various household needs, from the main functions we will highlight the most common:
- Extensions above the entrance group serve as protection for the porch and entrance door from precipitation.
- Terraces and verandas are a place for outdoor recreation.
- Covered galleries, often made of metal and polycarbonate, provide a comfortable entrance to the house and at the same time provide parking for a car.

Large sheds attached to the house, photo of a practical, arched design
- Awnings over windows, usually awnings, protect from the bright sun.
- Outbuildings for storing firewood and other household utensils are built on the back side of the house; sometimes, with due imagination, these are original, exclusive structures that decorate the facade of the building.

Sheds attached to a house made of corrugated sheets, photo of outbuildings for firewood
Types of canopies for the house
Canopies near the house are divided according to the method of support to the main building:
- Cantilever - small canopies on mensols or embedded elements.
- Suspended - roofs on metal cables.
- Supporting – on vertical posts around the entire perimeter;
- Support-beam - the edge located closer to the house rests on a beam tied to the wall, which helps distribute the load over the entire surface of the supporting structure, and the opposite - on the pillars.
Design Features
Canopies for private homes and public buildings are usually:
- Open – roof that protects from precipitation: entrance lobby, terrace, parking lot, outbuildings.
- Semi-closed - a blind parapet is provided at the bottom 900-1200 mm, and the openings are closed with thick curtains, soft glass, lattice, climbing plants, grapes: terraces, gazebos.
- Covered - glazed buildings of various types, usually verandas, attached corridors, greenhouses.

Sheds attached to a house made of polycarbonate, photo of the original design, echoing the shape of the steps
Roof
Buildings adjacent to the house may have different rafter systems. The easiest way is to make a pitched roof, at an angle of 15-25 o, it protects from precipitation, but does not protect from gusts of wind and dust. A gable roof is more practical, although it looks more cumbersome. Often it is arranged if the main building has a roof of the same shape.

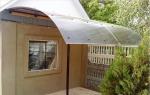
A polycarbonate canopy attached to the house, photo of an open terrace for relaxation
Recently, arched structures have become popular, usually a polycarbonate canopy attached to a house on a metal frame. The buildings have gained popularity due to their low price, ease of installation and a certain elegance due to the materials. They do not clutter up the architectural ensemble and are practical, reliable protection from atmospheric surprises.
Materials
Before you build a canopy for your house, you should carefully select the materials for construction. Essentially, this is a frame and a roof; let’s look at what is best to make each structural element from.
Frame
The basis for a canopy for a house is traditionally made of wood, metal, stone, concrete, brick. The choice depends on the design of the main building, financial capabilities and preferences of the owners.
The easiest to manufacture are wooden canopies; the material is easily processed with household tools, working with it does not require professional skills. For supports, use a rounded log or timber 100*100, 150*150 mm; for decoration you can buy ready-made carvings, figured columns and balusters, and an openwork lattice. Wooden buildings look beautiful and noble, but do not tolerate moisture and biological influences well, and are afraid of fire. To preserve the aesthetics of the canopy for the house, ensure fire safety and avoid damage to load-bearing structures by insects, rodents, and fungi, it is necessary to thoroughly impregnate all elements with protective compounds.

Corner canopies for the house, a project for a functional extension with an additional balcony area
Metal canopies for the house are the most popular and diverse type of structures:
- prefabricated, prefabricated aluminum products, often under a tent roof;
- welded structures made of metal profiles or round pipes;
- welded stainless steel extensions;
- forged awnings for the house.
Working with metal requires equipment and the ability to work with it, but such buildings are the most durable and durable compared to wooden ones, the cost of the products is approximately the same. A serious enemy of a metal frame is rust; all parts must be cleaned, primed and painted. Another disadvantage is that the material quickly heats up and cools down, so if a parapet is provided for the canopy, then it is better to make the railings wooden.

An example of how to make a beautiful canopy for a house from a metal profile with your own hands; you can decorate the extension with ready-made forged elements
Helpful advice: To decorate a welded canopy for a house, use ready-made stamped forging.Concrete, stone and brick awnings to the house look massive and solid. As a rule, they are planned at the project development stage and are built together with the house, under a single roof. If the extension is done later, you should think about the foundation and connection to the house; professionals do not recommend making a rigid coupling of two buildings, since cracks, breaks, and destruction may occur due to the difference in the weight of the buildings and heaving of the soil.

To properly make a canopy for your house, it is better to take projects online and adjust them to your own dimensions
Roofing material
Designers advise covering the shed roof with the same roofing material as the main house, but this is not always advisable, especially if the extension is small and done later. Today, the best solution is cellular polycarbonate 6-8 mm thick - fast, practical, inexpensive, you can choose the color, looks easy, suitable for frames made of any materials and for all rafter systems, indispensable for arched structures.
For single- and double-slope roofs, corrugated sheets, metal tiles, ondulin, roofing felt, and slate are often used. For a soft roof, a continuous sheathing made of moisture-resistant plywood, OSB, bars, slats or edged boards is required.

Canopy for the house made of polycarbonate, in the photo there is a beam-support structure
How to make a canopy for your house with your own hands
We will make a wooden canopy for the house with our own hands, place it along the wall, the roof is pitched, the foundation is strip.
Site preparation and foundation pouring
We clear the area near the house, remove the fertile layer of soil, drive in pegs around the perimeter and in the locations of the load-bearing elements, pull the rope, check the geometry. According to the markings, we dig trenches 700 mm deep, pour 100 mm of crushed stone and 100 mm of sand onto the bottom, and tamp the cushion.

The height of the foundation strip for a canopy must be greater than the width
On the pillow we knit a reinforcing frame made of corrugated rods with a cross-section of 8-10 mm. In the corners, we hammer 3-4 rods directly into the ground, attach horizontal reinforcement to them, and use tie wire for fixation.

The reinforcing frame for the canopy can be made of polypropylene reinforcement and tied with plaits
We make the sheathing from edged boards or plywood soaked in machine oil, strengthen it with bevels, and check it with a level. We fill the foundation of the canopy to the house with concrete.

The tape should be poured simultaneously to avoid the formation of seams
After 28 days, after the concrete has completely set, we remove the sheathing and cover the bottom with geotextile, which can be replaced with roofing felt. Overlapping joints 100-250 mm.

Geotextiles will protect wood from accumulating dampness from the ground
Important: The canopy to the house must have its own independent foundation. It is not recommended to tie 2 bases to a rigid hitch.Frame
We lay sheets of roofing material on the tape where the wooden beams will pass. We treat timber 150*150 mm with antiseptics and a fire-resistant compound, lay it on the foundation, and attach the logs to each other on galvanized corners.
We cover the outer, visible part of the foundation with artificial stone, and spread roofing material on top of the joists.

To finish the base, you can use any natural material or decorative plaster.
We lay the floor from edged boards, 50*150 mm, chamfered at the edges 2-3 mm, fastened to special studs, the gap between the sheets is 2 mm. Near the wall of the house and along the outside of the canopy we install vertical posts, 150*150 mm beams, and fix them with anchor bolts.

Natural plank flooring can be replaced with decking
We make the strapping with the same timber along the upper ends of the supports. We attach it to the house with anchors; a horizontal beam will help distribute the load across the entire load-bearing wall.

A wooden rafter system can be replaced with a metal truss made from a 40*40 mm metal profile
We lay the rafter beams, connecting the outer and inner posts in pairs, and strengthen the connections with bevels. We support the inner edge of the rafter leg on the beam, the outer edge should extend beyond the frame by 300 mm. We attach it to the slide or corners.

To ensure the strength of the canopy, double fastening should be done to the house.
To make a rafter system, you can take a 150*40 mm edged board. After assembly, be sure to check the vertical and horizontal of the frame with a level and plumb line.

The optimal distance between the logs is 1000-1500 mm
We make a transverse lathing from a bar with an edge of 50*50, 60*60 mm. We fix it with nails or self-tapping screws. We prime the frame and coat it with varnish or colored oil.

The frequency of sheathing depends on the roofing material and the snow and wind loads in the region
We lay polycarbonate on top, join the sheets through special strips, and attach them to the beam using thermal washers.

A polycarbonate canopy attached to the house, in the photo there is a glazed veranda
If necessary, we cover the openings with monolithically cast polycarbonate or glass. You can decorate a canopy for your house with decorative openwork grilles or carvings.
Planning the arrangement of the courtyard space of a private house often involves making a canopy. This relatively simple and reliable design can be used to protect the car from rain, snow or direct sunlight. Places for outdoor recreation are arranged under it. How to make a canopy in the courtyard of a private house with your own hands at minimal cost?
Choosing a canopy design
At the first stage, you need to choose the right place for the future structure. To do this, the total area of the canopy, its height and configuration are calculated. It should not reduce the natural lighting of rooms in a private house; there must be no direct contact with power lines. The next stage is the choice of design.

The main difference between the models is the roof configuration. According to this parameter, canopies are conditionally divided into the following groups:
- Single-pitch. The easiest option for self-production. It is important to correctly calculate the angle of inclination of the roof and choose the appropriate material for its arrangement. Disadvantage – insufficient degree of protection in case of side winds during rain or snow. Such canopies are most often made close to the house to reduce the influence of this factor.
- Gable. They have all the advantages of a similar roof for a house - uniform load on the snow cap, protection from slanting rain. The complexity of the arrangement lies in the formation of the ridge part and the calculation of the angle of inclination of the slopes.
- Arched. They have the best aesthetic and performance properties. They are used as roofing material. Difficulties arise during the manufacture of the frame - the arched parts must be identical to avoid refractions of the polycarbonate and ensure its tight pressing.
The choice depends on the availability of materials, the possibility of purchasing them, tools and experience in the construction of such structures. Most often they stop at a simple lean-to canopy.
Manufacturing materials
The future design is subject to special requirements - it must be reliable, not subject to change over a long period of time, and resistant to moisture and temperature changes. In addition to the configuration, these parameters are affected by the material of manufacture.

The main elements of a canopy for the yard of a private house:
- Support posts. They must withstand the weight of the roof, and the snow load is additionally taken into account.
- Roofing material fixation system. Most often, a lattice base is made on which the roofing material is installed. If it is polycarbonate, the distance between the fasteners is as large as possible to ensure illumination of the enclosed area.
- Roofing material. You can use any suitable material, from ordinary roofing felt to cellular polycarbonate. It is important to follow the installation technology and provide waterproof protection.

Each of these elements needs to be considered in more detail.
Frame
To save space and reliability, it is recommended to choose round or square pipes as the material for making racks. They are relatively easy to process; after installation, a protective coating of a layer of paint is applied. The connection of elements is done using welding. The mechanical assembly is not reliable enough.

The supporting racks must be made of square pipes with a minimum size of 100 * 100 mm. The support for the roof deck is made from scraps of a smaller section - 50 * 50 mm. The amount of material depends on the size of the canopy and its height.
An alternative to steel pipes is a frame made of wooden blocks and boards. It is less reliable than metal; wood dries out and changes shape under the influence of moisture and temperature.

It is used if consumables are available, in order to create an architectural ensemble that is unified with the house. Before assembly, the elements must be treated with moisture-proof and antifungal agents.
Roof
The use of traditional roofing material will provide protection from moisture and a long service life of the coating. Additionally, you need to take into account the rules of arrangement. Some will require a solid base, which will increase the labor intensity of the work.

Materials used for canopy roofing:
- Polycarbonate. The best choice in terms of quality, installation complexity and reliability. The low specific gravity and windage are compensated by the increased frequency of fastening. ABOUT .
- Sheet slate. An economical option, but it is heavy, so be sure to use a waterproof film.
- Bitumen roofing. It is laid on a solid base and is light in weight. Disadvantage: to ensure tightness, the seams undergo heat treatment, which requires standing on the roof. This is impossible if the structure is not designed to support the weight of an adult.
- Profiled sheeting. Its properties are similar to slate, but it is characterized by light weight and ease of installation.
After selecting all consumables, you can begin construction.
Canopy in the courtyard of a house: step-by-step manufacturing instructions
First you need to prepare the site. It is leveled and filled with concrete. An alternative is laying paving slabs. An option with less labor costs is to arrange a foundation only for support columns. A prerequisite is a flat surface for attaching the racks.

Then you need to do the following.
- Install support columns and secure them. Use a level and plumb to check the correct position.
- Temporary stiffeners can be used to secure the supports.
- Installation of the base for the roof, fastening it to the supporting structure.
- Installation of roofing material.
- Checking the reliability of the canopy.
If profile pipes were used as the manufacturing material, after assembly they need to be primed and painted.