How to build a smart chicken coop. Do-it-yourself chicken coop: making a winter chicken coop, step-by-step instructions with photos. Perches and nests
If you dream of raising chickens in your country house, but the lack of a specialized room is stopping you, don’t despair; building a comfortable and functional chicken coop with your own hands is not at all difficult.
First of all, you need to decide on the number of chickens that will live in the future building.

Taking this information into account, you can plan the size of the chicken coop and allocate space for the building.

You can make a simple chicken coop from any available materials, naturally, having at least the most minimal construction skills.

Requirements for the building
Any specialized structure must meet the requirements for its functionality. Even at the design stage, some points should be taken into account:
- Ensuring the safety of the structure from predators. Otherwise, you may miss the number of birds or the number of eggs.
- Provide for the possibility of ventilation or constant ventilation of the poultry house.
- The absence of drafts is an important requirement that will prevent all kinds of bird diseases and help maintain a comfortable temperature.
- Thermal insulation is also necessary, especially if you plan to keep chickens all year round.
- For good egg production of chickens, the room needs lighting, which must be turned on at some time of the day.
Chicken coop project
Choose a place for the chicken coop on a hill; in the lowlands, the poultry house will be constantly wet, not having time to dry out from the morning fogs and precipitation.

When calculating the area of the building, do not forget about poultry walking; the more the hens walk, the better they lay. When accurately calculating the area of the chicken coop, take into account the fact that for the comfortable existence of five chickens, 4 sq.m. is enough, and about 7 sq.m. of space for walking.

The clearing for walking chickens would be correctly located to the south. Fence it with a chain-link mesh and be sure to make a roof. It will protect not only from rain, but also from the sun.

If your site is flat, then before construction, make an artificial elevation of sand and crushed stone. To protect the coop from small rodents, mix clay and broken glass and place on top of the mound.

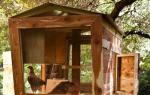
Natural lighting in the poultry house can be provided by making a door with glass. To provide space, the ceiling is raised to 2 m. If bird nests are placed outside the house, you will not have to go inside to pick up the eggs. You can see a drawing of this version of the chicken coop in the photo.

Foundation
If you are building a summer frame chicken coop, you do not need a concrete foundation for it, just a slight elevation is enough.
When building a permanent brick structure, a foundation is required. A monolithic or strip base is suitable here. It is ideal to place a winter chicken coop in such a room.

Poultry house floor
Earthen and clay floors can be made with a low strip foundation. If desired, the floors can be assembled from boards or concreted.

When using the room in winter, the floor must be insulated with mineral wool, which is laid between the joists and then covered with plywood. Such floors are covered with sheets of roofing felt to provide reliable coverage and protect the floor from bird waste products.


Sand is also good for sprinkling the floor.

Note!

Construction of walls
Most often, the walls of a chicken coop are built of wood; as a rule, it is a frame building covered with clapboard. They are insulated with mineral wool or polystyrene foam, and the outside of the building is covered with a vapor barrier material before cladding.
A brick building requires good heating in winter, which will lead to costs, and the construction of such a chicken coop will be more complex and expensive.

Walls made of any materials must be disinfected before use; this can be done with ordinary lime.

Chicken coop roof
When building a chicken coop for chickens in the country, it is better to make a gable roof. This technique will help allocate space for roof insulation.

If the chicken coop is of modest size, you can do without an attic and lay the insulation directly under the roofing material. Chicken coops are covered with slate, metal tiles, and professional flooring.
Room ventilation
Good ventilation is important for bird health, especially in the summer. The ventilation system in the chicken coop can consist of several holes on opposite walls with valves.

Note!

The valves will help control and regulate the flow of cold air, which is especially important in winter.

Chicken coop interior
The most important and basic element of the interior of the chicken coop is the perches; they are wooden rounded poles, the length from wall to wall of the chicken coop. It is on roosts that chickens spend most of their lives.

They need to be fixed at a distance of 50 cm from the floor and 25 cm from the wall and 35 cm between each other. Each resident of the poultry house is provided with 25 cm of poles. So we are counting on 10 chickens in the chicken coop, we will have to place perches at 2.5 m.

If laying hens live in the chicken coop, then the second important piece of furniture will be nests. You need to build at the rate of 5 laying hens per nest. Having built a chicken coop for 20 chickens, you will have to place about 4 nests.

It is best to place them in the dark corners of the chicken coop, having previously been well insulated with sawdust.

The dimensions of the layer box are 30cm x 30cm wide and 40cm high. The nest is raised 50 cm from the floor.
Note!


Lighting
An important condition for the normal functioning of a chicken is lighting. In dark rooms, the bird becomes inactive and its egg production decreases.

The chicken coop must have an opening window, which will provide not only sunlight, but also additional ventilation.

Laying hens must be provided with light up to 18 hours a day. In winter, you cannot do without artificial lighting.

Heating the chicken coop
In winter, the chicken coop must be heated to a temperature of at least 10 degrees during the day and 15 at night. It is important to control the level of humidity in winter; increased humidity will lead to illness and further death of birds.


In our selection of photos of chicken coops, you can choose the best option for yourself.

DIY chicken coop photo


Different buildings are possible - the design depends on the number of inhabitants, time of use (summer season or all year), terrain conditions, available materials. It is important to draw up detailed drawings - they will help you not forget anything and will reduce construction time.
How to build a chicken coop with your own hands
To properly build a poultry house, it is important to meet a number of conditions.
Requirements for a home barn for chickens
- Temperature. In winter, thermal insulation and heating are required; the ideal temperature for this season is 12 C°. In addition, the room should not be ventilated, as drafts are dangerous for birds. In the summer, the chicken coop should not be hotter than 25 C°, otherwise egg production will drop by half. At 30 C°, chickens will not lay eggs. When setting up a chicken coop, it is worth putting shutters on the plywood windows, and providing a run in the shade of a tree or building or under a canopy. Polycarbonate is one of the most affordable and simple materials that can be used for a canopy. Find out how to choose a polycarbonate greenhouse.
- Dryness. High humidity, especially during cold weather, can lead to illness in chickens. For large buildings, the problem can be solved by making small barred windows opposite the main ones. It is possible to install ventilation in the form of two wooden boxes at different ends. Another option is two pipes, under the roof and at a distance of 30-35 cm from it. Both boxes and roofs must have dampers that allow air flow to be regulated. What a wooden children's house for a summer cottage is is described.
- Light. Affects the egg production of birds. Light is important for chicken egg production, so you will have to equip the room with warm yellow lamps (preferably with shades - for fire safety). You can install a relay that turns on the lighting. It is important to place all equipment and wires out of reach of the bird. Windows are especially important in winter. Place windows behind a layer of metal mesh or wooden bars to prevent chickens from breaking them. Feeders and drinkers require better lighting. The chicken coop yard can be equipped.
- Peace. For the bird to feel safe, there should be no sources of strong noise around. The chicken coop should be built at the far end of the yard, where people and animals usually do not go. You can place the room behind a hedge, which gives the bird protection from the wind, shade and food in the form of insects.
- Protection from predators. Uninvited guests entering a room with chickens will probably harm the birds or spoil the eggs. Rodents are carriers of diseases dangerous to chickens. Under the foundation or walls it is worth sketching sharp metal fragments, wires, glass. They can also be used to strew the ground under the floor, if it is not earthen. In the absence of a foundation, the bottom of the walls is covered with tin.
To secure the chicken coop, lower the foundation or metal mesh 30 cm into the ground (the mesh, filled with a special solution, can be located below the foundation).
How to properly build a chicken coop in the country
Construction materials
- The foundation will require concrete or cement and brick, depending on the type (strip or column).
- The timber is used to construct the frame; walls made of timber are possible. You can also build a log chicken coop. Brick, foam and cinder blocks, and adobe are also used for walls. The latter is preferable and retains heat on a par with logs and beams. Read also about making a brick tandoor with your own hands.
- Boards for cladding.
- Insulation can be used for walls, located between two layers of boards. In this case, protection from rodents is mandatory. Moss or jute is needed to caulk cracks in a log chicken coop.
- Sheet plywood is suitable for lining the inside of a room and building nests.
- Ruberoid, metal tiles, slate, tin, etc. go to the roof. Two layers of roofing felt are laid between the foundation and the first crown of the walls to protect them from rotting (wooden).
- Nails and screws.
- Metal fastenings and mesh.
Calculations and dimensions
Immediately provide a place for feeders, drinkers, nests, boxes of sand (needed so that the chickens can maintain hygiene by lying in it) - all this reduces the free space for the bird. 
- For 2-4 birds, an area of 1 m² is comfortable (meat breeds require more space). On the roost, one chicken occupies about 30 cm; in winter this distance is less.
- There should be at least 40 cm between adjacent poles, 30 cm between the perch and the wall. The height of the poles is 50 cm.
- The room should not be lower than 1.8 meters. This height will allow the owner to freely enter the chicken coop. The run is built at a minimum of 1-3 m² per bird.
- Nests can be made measuring 30x30x40 cm (40 cm depth). They are placed 40 cm from the floor. For ten chickens you need 3-4 nests.
Please note that a separate nook must be provided for keeping chickens in the chicken coop. It is better to separate young animals and adults.
Drawings for winter (warm) and summer
SNiP 30-02-97 standards that you need to rely on when calculating the size of the chicken coop:
- No more than 40 birds can be kept in one summer cottage.
- The minimum distance from the chicken coop to the border of the territory is 4 meters.
- if the building is adjacent to the house, it must have a separate entrance at least 7 m from the door to the living space. You can also install .
- the project must be coordinated with the architectural commission - this will avoid complaints and proceedings in the future.
In the village, if chickens are kept for personal use, there are no requirements– local government rules apply.
How to make a doghouse will tell you.
Location
- Movement is important for chickens, their egg production and weight gain, so it makes sense to build a mesh-fenced enclosure adjacent to the chicken coop if there is no other area for the birds to move freely. It is also useful to take into account a possible increase in the number of livestock in advance. We also recommend that you familiarize yourself with the construction of a children's playground for a summer residence.
- The chicken coop should be built on a hill, and drainage ditches should be dug around it. The correct choice of location will ensure both a dry room and the ability to release chickens into the enclosure without waiting for the snow to melt in the lowlands or the mud to dry. And the tree will rot less. The elevation can be filled independently from gravel, crushed stone, etc.
- A rectangular chicken coop should be positioned from west to east with windows on the south side for the best lighting. From the south, a door, a hole and an aviary are built - for protection from cold winds. The walls on the windward side must be solid and not blown through.

Perches and floor
- The perches are made of 4x6 cm timber with rounded edges. The bird should not injure its paws while sitting on them. Please note that on perches that are too small and completely round, it is more difficult for chickens to stay on.
- You should not place the bars at different levels - the lower ones will be empty, and droppings will fall on the chickens remaining on them. It is better to make the perches removable - for sanitation.
- Sawdust, straw, and peat are very suitable for bedding. The litter can be deep (50-100 cm) or shallow. The first one is simply dug up when it gets dirty, the second one is changed as soon as it becomes wet. Litter is an additional insulation for.
The floor is made of two layers of boards, between which there will be insulation. This provides protection from freezing and blowing. A 100x100 mm beam and a 25 mm thick bottom board are used. There is bedding on top. Pay attention to how to make cleaning the chicken coop easier. You can make the floor sloping or place pallets under perches. The perch should be comfortable for the chickens, and it is better that it is removable for easy cleaning.
Nests, drinkers and feeders
- in order for the bird to fly well, they must be secluded and darkened;
- there should be bedding inside;
- nests are made in the form of boxes, closed at the top - the bird should not sit on their edges, otherwise the eggs will end up in the droppings.
The dimensions of a chicken coop for 10 chickens are outlined.
It is very convenient to equip the nests with a separate lockable entrance for collecting eggs and changing the litter.
- It is logical to place feeders and drinking bowls in a place that is easily accessible for both the chickens and the owner;
- Feeders and drinkers should be installed at the height of the bird’s back - this way she will have to stretch her neck, but she will not be able to scatter food on the floor with her paws;
- There should be enough feeders and drinkers so that all the chickens can eat at the same time. This will ensure equal development of the bird.
Cheap chicken coop made from scrap materials
It’s easy to build a chicken coop using what you have on hand. The costs in this case will be minimal. Some materials can be reused or asked from neighbors who do not need them.
- quite suitable for chickens even in a room without a foundation;
- a cheap foundation on pillars, in which you can use the remains of old brick;
- Various cobblestones, etc. are also suitable;
- the floor can be earthen or adobe, made of several layers of rich clay. This will reduce the cost of floorboards;
- Remnants of slate, tin, and durable plastic are used for the roof;
- The walls can be covered with any boards that are found on the farm. For example, material from an old fence, removed and left idle, would also be suitable.

How to insulate a chicken room
If you plan to keep birds year-round, you need to consider some features. In the case of a winter chicken coop, a large size can lead to big problems. To maintain warmth, birds huddle together, taking up not much space on the perches. But it is not so easy to heat a large room; the costs of thermal insulation will also be high.
- it is necessary to cover the walls with a layer of heat-insulating material to maintain the room temperature at 15 degrees;
- The log chicken coop must be carefully caulked. The floor can be covered with deep litter;
- Second frames are installed in the windows for the winter period, which are removed in the summer;
- it is recommended to make the roof under which warm air collects two layers;
- if the chicken coop has an attic, its floor should be covered with a layer of straw or sawdust;
- the vestibule in front of the door or manhole will not allow cold air to penetrate directly into the chicken coop;
- For heating, powerful lamps or a heater that meets safety requirements are suitable.
Video
The video will tell you how to properly build a chicken coop with your own hands using scrap materials and imagination.
It is possible that you may need to know how to build.
Various chicken coop projects photos
Building a chicken coop with your own hands is not at all difficult, just carefully study the materials on this topic and find a suitable project.
We invite you to look at a selection of photographs that will help you build an interesting chicken coop for your household. yard
Read about how to make a cage for rabbits.

A good-quality chicken coop that is easy to build with your own hands

Chicken coop with closed range, suitable for small areas

A winter chicken coop with an enclosed range is an excellent option for our winters

A chicken coop can also be an interesting decoration for a household yard
As you can see, building a chicken coop is not so difficult if you approach this matter creatively and with imagination. Surely there will be suitable materials on your site to build a comfortable house for poultry.
1022 09/18/2019 7 min.Every pet needs a well-equipped home. Farm livestock and poultry are no exception. When creating a home, it is necessary to take into account the characteristics of its future residents. Paying attention to detail during the construction phase will greatly enhance their productivity. Among chickens, housing conditions are mainly important for laying hens and brood hens. Housing for laying hens is not very different from conventional chicken coops. However, these features make it possible to create comfortable conditions for birds to lay eggs. For such purposes it is not necessary to create a new building. You can independently, using improvised means, equip an ordinary barn taking into account the needs of laying hens.
Features of chicken coops for laying hens
Housing for chickens should be equipped taking into account their orientation and breed characteristics. When breeding laying hens, the main requirements for their housing are the presence of a good paddock for walking, prepared in advance and sufficient lighting. Such conditions are explained by the direct dependence of productivity on the level of bird mobility. In order for egg production to be high, chickens need a spacious place to walk.
Properly equipped nests greatly facilitate the process of egg collection, and the length of daylight hours affects the number of eggs laid.
Cage housing is not suitable for laying hens, as they rapidly gain weight, but their egg production is significantly reduced. For this purpose, a small chicken coop with extensive walking is suitable.
Internal layout
Before starting any construction work, you need to carefully consider all the features of the building. This is especially true for the interior of the barn. A chicken coop for laying hens must contain:
- artificial lighting;
- good;
- perches, nests;
- containers with coarse sand or broken shells;
- space for ash baths.

Lighting
For increased productivity, laying hens need long daylight hours - at least 15 hours. Artificial lighting inside the chicken coop allows you to maintain this indicator throughout the year. For these purposes, you can use fluorescent and infrared lamps, as well as incandescent lamps.
Feeders and drinkers
They can be purchased at the store, but the simplest options can be made from wood, plastic or steel. There is also a classification of feeders and drinkers by type:
- tray;
- grooved;
- bunker (automatic).
Their number should be sufficient to prevent the birds from jostling and fighting. Good designs have sides that are folded inward, which prevents food from being thrown around.

DIY feeders and drinkers.
Feeders and drinkers should be located in a well-lit place, otherwise birds will have difficulty finding them.
Perches and nests
For this you can use wooden or plastic boxes, wicker baskets or buckets. It is also easy to build a nest from boards, plywood or other available materials. Birds are not picky in this regard, but you should take care in advance of good bedding in the house, using hay or straw. In addition, it is necessary to calculate the required number of nests, calculating 4-5 birds per place.
Chickens need rest, for which good perches should be installed in the chicken coop. The perch can be made from treated wooden beams with rounded edges. Depending on the number of birds in the chicken coop, one or more perches are installed along the wall.

It is advisable to place the nests in such a way that the birds do not see each other, and also away from the entrance.
Any equipment in the chicken coop must be well treated to avoid rough edges, sharp corners and other elements that could harm the bird.
Ventilation
 Particular attention should be paid to the ventilation of the room where the birds will be kept. The type of ventilation is selected depending on the size of the room and the number of birds. For a small chicken coop, supply and exhaust ventilation is suitable. If its area is large, it is necessary to install forced ventilation using a fan.
A well-chosen ventilation system will eliminate the unpleasant odor of excrement and regulate the temperature and humidity inside the chicken coop.
Design features
When making your own chicken coop for laying hens, be sure to take into account the following requirements for the structure:
- No dampness or drafts in the building. The chicken coop must be dry, warm and draft-free. Otherwise, the birds will often get sick, which will negatively affect breeding productivity.
- Strong and heat-saving walls. In regions with cold winters, walls are additionally insulated with special materials (organic wool, clay).
- Safe building materials. Chickens love to peck everything, including their home. Therefore, all materials used to build a chicken coop must be safe for the birds, even if they eat them.
- Foundation or pedestal. The elevation will protect the birds' home from rodents.
- Windows without cracks. Otherwise, the wind will blow into the chicken coop, and the chickens will be able to get to the insulating material.
- Warm and practical floor. Additionally, lime is placed on the floor, and a bedding of sawdust, shavings, straw or hay 5-10 cm thick is placed on top. It must be changed periodically.

The comfort of the chicken coop will be rewarded in the future by egg production.
Materials for construction
When building a chicken coop for laying hens yourself, you can use most available materials as building materials. Concrete, earth, wood, asphalt or clay are suitable for the floor. Cinder blocks, wood, brick or stone are used as wall materials. Sand, clay, gravel or organic wool will help keep the walls warm. You can use timber as perches after pre-processing it. Bird nests are made from any available materials. The main thing is that they are safe for chickens. Read about ready-made chicken coops. 
It is advisable to treat the entire building with lime before use, and also place it under bedding.
Step-by-step construction instructions
Before you start building a chicken coop for laying hens, you need to calculate the parameters of the structure depending on the number of birds that will be kept in it. Construction is greatly facilitated if you first draw a plan taking into account all the parameters. In order not to be distracted during construction, to save time and money, you should carefully think through and prepare all the necessary building materials. He will tell you how to build a chicken coop in the country for the summer.
Premises
- Initially, calculations are made and a drawing/plan of the future chicken coop is drawn. Next, the site is marked in accordance with the plan.
- Holes are dug in the corners, with a depth of at least 1.5 meters, into which support pillars (wooden, metal) are subsequently installed, taking into account the height of the future barn. The lower part of the pillars must be wrapped in waterproofing material and additionally treated with machine oil to prevent the process of rotting. Pillars can be made of concrete, but the process of pouring them is long and expensive.
- After making the foundation, the first beams are laid on the pillars, which create the floor frame. In this case, the wall on which the door and manhole will be installed must be higher than the opposite one. This will create a roof slope for good water drainage.
- Vertical guide bars for the walls are nailed to the base of the chicken coop, and then horizontal guide bars for the floor and ceiling. In this case, you should immediately mark the locations of the openings for windows, doors and manholes. Everything is attached to each other using nails, which should not extend beyond the material.
- After creating the frame of the building from the selected building materials, the floor is laid, the ceiling and walls are attached. The interior of the walls is lined with insulation and a protective layer.
- The entire building is checked, and any cracks are sealed with waterproofing foam.
- After this, the roof is attached, which should be single or gable, with additional decking for protection from precipitation. Ventilation is located in the designated location.
- Windows and a door are located in the marked places in the walls. All cracks are sealed with foam.

Estimates for the construction of the future chicken coop are approximate.
Aviary
An enclosure for walking can be part of a building, or a separate structure. He will tell you about a chicken coop made from pallets with his own hands.
Part of a chicken coop
- After the construction of the barn is completed, an enclosure for walking is located opposite the entrance. In appearance, it is a structure made of a metal or wooden frame, between the countries of which there is a protective mesh. The mesh holes should be as small as possible to prevent birds from getting through them.
- Depending on the layout of the main structure, the roof of the barn may extend over the enclosure. In this case, it is necessary to install support beams on the sides to support it.
- The structure is attached to the main structure in such a way that birds cannot get out of it. That is, the bird hole opens into the aviary.
- The enclosure may have a concrete floor, which will protect the structure from attacks by rodents and predators. In this case, the base of the enclosure is made at the same time as the base of the barn. More budget options do not have a floor, but are located directly on the ground.

The northern part of the enclosure should be deaf, and the southern part should be open to the sun.
Separate building
- This design is also made of a metal or wooden frame, with a stretched mesh as walls. The shape and size can be any depending on the wishes of the poultry farmer. In most cases, such structures resemble a hut or an inverted box.
- These enclosures do not have a roof, but their advantage is mobility. If necessary, they can be moved to any site.
Features of a summer chicken coop
A summer barn for laying hens has some differences from buildings for year-round maintenance. Such buildings in most regions do not require insulation, and their walls are made of thin plywood or lining. In warmer locations, buildings may not have windows to encourage natural ventilation. Summer chicken coops do not require heating, but they do need a good ventilation system. This is necessary, since in the warm season the temperature inside the room quickly increases, which can negatively affect the birds’ productivity and health, including death due to overheating. He will tell you about heating the chicken coop in winter.
Video
In this video you can see how to build a chicken coop for laying hens with your own hands.
conclusions
- A chicken coop for laying birds can be made with your own hands from scrap materials, which will significantly reduce the cost of their maintenance and care.
- All building materials used in the manufacture of the main room and enclosure must be safe for chickens, as they tend to peck at everything.
- A well-made and equipped chicken coop contributes to the productivity of laying hens.
- To maintain stable egg production year-round, it is necessary to install artificial lighting in the barn. Read about.
- The room must be well protected from dampness and drafts, otherwise the birds will get sick, which will negatively affect the productivity of their keeping.
The chicken coop itself should be located in the most remote part of the fenced yard. People and pets should not often walk near it, as some breeds of chickens experience extreme stress when strangers are in the yard.
A partly shaded place, protected from rain, is ideal for a poultry house. You can place housing for chickens near dense bushes. In sunny weather they will provide reliable shade, and in rainy and windy weather they will become an excellent shelter for birds. As a rule, various insects often live under bushes, so chickens will like to rummage in the ground around them.
Reliable chicken coop with extensive range
You also need to worry in advance about the future protection of chickens from such cunning predators as foxes. For additional protection, the poultry house is built from high-quality wood having a thickness of 19 mm.
The fencing should not have any openings through which foxes or rodents could enter the coop. In this case, the building does not need to be placed on the ground.
Ideally, the house should be on a foundation or stilts to prevent foxes and rats from undermining. If fox holes were noticed nearby, the ground around the chicken coop is additionally strengthened with a metal mesh.
A good chicken coop is one of the components of proper maintenance and raising healthy livestock.
How to build it yourself
Determination of the area of the poultry house and walking yard
The chicken coop should not be too cramped for the birds, so the area should be calculated responsibly. During the construction of the chicken coop, its dimensions are calculated as follows: per 1 sq. m can live 2-3 birds.
But this does not mean that a chicken coop of 1 square meter is enough for two chickens. m. Birds will not be able to feel comfortable, so you need to start from a minimum area of 3 square meters. m.
There is always a small walking yard near each poultry house. It is fenced with a net and at least 2 square meters are provided for each chicken. m of free space.
Thus, for a flock of 10 chickens, a yard with an area of 2x7 m is well suited. If there are 20 chickens, the size of the yard doubles.
In the photo you can see the optimal dimensions for a small chicken coop:

Laying the foundation
- The site intended for construction is completely cleared of bushes and other large vegetation. You don't have to worry about weeds and herbaceous plants.
- After this, a flat hole with a depth of at least 30 cm is dug. The bottom and walls of the hole are lined with galvanized mesh.
- After this, it is filled with a special solution, which more reliably bonds it to the ground. This prevents rodents and foxes from entering the coop from underground.
- Formwork is attached around the perimeter of the foundation. Its second internal frame is built at a distance of approximately 20 cm from the first.
- After this, it is filled with concrete, which is covered with burlap. In this condition, the foundation for the chicken coop must stand for several days so that the solution can dry properly.
- After the solution has hardened, the formwork is removed, and then the foundation of the poultry house is filled with the soil remaining after digging the hole. It should be carefully leveled so that it fits well on the galvanized mesh.
- Now all that remains is to install the poultry house itself on the manufactured foundation.

Walling
The walls of the poultry house are constructed using standard technology.
The first crown must be insulated from the foundation with a double layer of roofing material or any other insulating material. In this case, the ends of the beam are always fastened into half a tree.
The gaps formed between them are closed with scraps of wooden beams. All subsequent crowns are laid in the same way. They are connected at the corners using a tongue-and-groove fastening.
Do not forget that insulation must be laid between the crowns and in the locking fastenings. Flax-jute fabric will perfectly cope with this role. It perfectly retains heat inside the chicken coop, preventing it from dissipating even during the harsh winter.
However, if the poultry house is built from timber with natural moisture, then the crowns should be attached to dowels made of wood.
Special holes are made for dowels in the corners of the log house.. They need to be placed every 1-1.5 meters in a checkerboard pattern. The depth of the hole should be the thickness of two and a half beams.
After making the holes, the dowels are driven into the wood to a depth of 7 cm. This must be done so that after shrinkage the walls of the poultry house do not begin to slant to the side.
The walls of the poultry house must be at least 1.8 meters high. When the work with the walls is completed, you can begin attaching the ceiling beams, rafters and roofing.

Roof construction
The best design for the roof of a chicken coop is considered to be a gable one, since the resulting attic space will become a convenient place for storing various equipment. You can also store feed, hay and garden supplies there.
Often used for roof construction wooden beams located at an angle to each other.
Some breeders think that a flat roof may be a more viable option for a chicken coop, but this is not entirely true. It will retain water, which over time can damage the roof of the finished structure.
In the photo you can see how rafters for single-pitch and gable roofs are arranged:

Gable roof installation

Rafters for a lean-to
After installing the wooden beams that act as a roof, you can begin to cover the ceiling with boards. Absolutely any board can be suitable for these purposes, but it is important not to forget to insulate it, since most of the heat escapes through the ceiling and roof. To save on insulation, you can use cheaper coal slag and expanded clay.
In the photo you can see a diagram of the ceiling insulation in the chicken coop:

Ventilation arrangement
Before final insulation of the ceiling and roof, it is necessary to install the ventilation system. To do this, you need to knock down two wooden boxes and then attach them at different ends of the house.
One part of the ventilation pipe should be located 50 cm below the ceiling, and the second should be at the same level as the ceiling. You can regulate the level of air intake using tin dampers installed at the ends of the ventilation pipes.
Schematically, the ventilation system may look like this:

In this video you can see the process of building a chicken coop with your own hands:
Perch placement
It is imperative to arrange comfortable wooden perches in the poultry house. They are made from poles with a diameter of 4 to 6 cm.
They are located opposite the windows as far as possible from the entrance to the chicken coop. It will be more convenient for chickens if the height of the perch does not exceed 1.2 m for small breeds, and 0.6 m for large breeds.
Each hen requires approximately 20 cm of perch length so that the birds do not push each other too much while sleeping. As for the distance between the bars, it should not be less than 35 cm.
Location of nests
Chicken nests should be located in the farthest corner of the poultry house. Their number should be determined at the rate of one nest per 5 heads.
Best used as nests wooden boxes with a height of 35 cm, width and depth - 30 cm. At the same time, it is important to arrange a wide entrance to it.
The approximate width and height of the entrance should be 25 cm. A special 5 cm threshold is made at the entrance, and a take-off shelf is nailed in front of the nest.
The roof of the nest should be at a slope of 45% so that chickens cannot sit on it and soil it with droppings. It is advisable to arrange all the nests in one block, installing it on the floor of the poultry house. The nest block should rise 40 cm above the floor surface.
Dimensions and location of feeders
Chicken feeders should be as easy to maintain as possible. The length of each feeder depends on the total number of birds: approximately 10-15 cm for each chicken. This allows the birds to feed without pushing each other away. If feeding is done correctly, then there is no food left in the feeders.
At a height of 15 cm from the floor of the chicken coop, two small feeders are attached in the form of boxes with dimensions of 10x10x40 cm. They constantly contain chalk, shells or gravel, which are necessary for laying hens for the normal formation of eggs.
On the territory of the walking yard there are y-like feeders with lattice walls. They contain green food, which the birds must completely eat in one sitting.
In the photo you can see the schematic arrangement of perches, nests, and other equipment in the chicken coop:

Chicken coop arrangement diagram
Arrangement of the corral and gate
After completing all the main work, it’s time to start arranging the pen near the poultry house. Most often it is fenced using a rowan grid mounted on concrete pillars.
In this fence you need to make a convenient gate through which the owner of the site will pass to the birds. It is enough to put together a wooden frame from timber, stretch a mesh over it and that’s it – the gate is ready. But do not forget about the presence of a reliable lock on it.
As you already understood, when arranging a chicken coop, it is necessary to take into account many different points.
Preparing to move in
Before moving the birds in, you need to properly prepare the chicken coop. Preparatory work involves cleaning and disinfecting the chicken coop.
To kill all pathogens, you need to wash the chicken coop with a 2% hot solution of soda ash. To do this, just dilute 200 g of soda in a bucket of water. In addition to soda, you can use a 2-5% creolin solution. It is diluted in the same proportions as soda.
When the disinfection work is completed, the owner of the chicken coop needs to put straw or pine sawdust in the nests, pour food into the feeders, and pour water into the drinkers.
Hygiene in the chicken coop and timely disinfection are very important and every farmer knows about this.
In this video you will find practical tips on setting up a chicken coop:
How is a winter chicken coop different from a summer one?
- The winter one is large in size and the walls are insulated.
- A foundation and an additional vestibule must be made for them in order to better retain heat.
- The winter room is provided with lighting, heating and good ventilation.
- A special fenced walking area is equipped.
In the following video you can familiarize yourself in detail with the main nuances of building a winter chicken coop:
In conclusion, I would like to say that knowledge of how a chicken coop should be properly equipped will also be useful to you if you want to turn it into a chicken coop.
Well, we, in turn, are happy to provide you with information about how this type of activity can be beneficial and how to organize it from scratch.
If you find an error, please highlight a piece of text and click Ctrl+Enter.
Home or country farming is a great help. Even a dozen chickens will be provided with eggs and meat. The first thing to do is build a chicken coop for 10-20 chickens. Construction can be quite inexpensive.
Optimal sizes
If you approach the issue of determining the size of a chicken coop scrupulously, then for each breed of bird there is a certain standard of “living space”. But in a country house or in a private house they rarely keep a purebred bird. Therefore, they start from the average.
Estimating the area and dimensions of the building
When building a chicken coop, they usually proceed from the planned number of birds. It is believed that 2-4 chickens can live on 1 square meter of area. If we are talking about broilers, you can take 3-4 pieces per square meter. They are inactive and this area is enough for them. If we talk about laying hens or meat and egg breeds, it is believed that the optimal number is 2-3 birds per square area. So, a chicken coop for 10 broiler chickens can have an area of -2-3 square meters, a poultry house for 10 chickens - when keeping laying hens or meat and egg breeds - requires 4-5 square meters. If you decide to build a chicken coop for 20 chickens, the area for broilers will be 5-7 squares, for eggs and meat - 8-10 squares.

But knowing the area of a chicken coop for 20 chickens or 10 is not everything. We still need to decide on the sizes. Most often they try to make a rectangular building: 3 * 1.5 m; 4*, etc. In this case, you can clean the poultry house without going inside - a rake, scraper, broom will reach even the far corners. Square ones are not so convenient in this regard, although a small chicken coop for 10-20 chickens will still not be large. So a square is fine.
How tall should the chicken coop be?
When building a chicken coop, you still need to decide on the height of the building. For birds, a height of about 140-150 cm is sufficient. But you must remember that you will have to clean the house, collect eggs, and change bedding. So when choosing the height of the poultry house, they proceed from their own convenience. For this reason, the roof is made higher than head level - so that you can walk upright.

No overlap
There are two options when installing a roof. First: if the poultry house is without a ceiling (ceiling), you can remove the walls by about 140-150 cm, make the roof gable and raise the ridge by 180-200 cm (or a little higher, as is convenient for you). In this case, you can move around the center of the room without problems, but we still rarely go to the edges. There is usually a perch and nests there, and there may be bedding. You will have to work carefully in this area, protecting your head.

The benefit of this option is that with this arrangement we save on wall material. The downside is that more is spent on insulating the roof: it must be insulated over the entire area, which is significantly more than what is required when insulating the ceiling. But, in general, this option turns out to be less expensive, but also less convenient (you have to take care of your head).
With attic
The second option for how to build a chicken coop for 10-20 chickens is to make a mini-copy of a regular house. In this case, the walls are driven to the height required for free movement inside. This is a person’s height, plus 10-20 cm. But keep in mind that part of the height will go to the ceiling, there will also be a floor and bedding on it. Each requires about 15 cm of height. So, if the owner of the chicken coop is 180 cm tall, you will have to make walls with a minimum height of 220-230 cm.

As you can see, this option will require more materials for the walls, but only the ceiling (ceiling) can be insulated, and the attic can be left cold. The attic can also be used to store straw, bedding, etc. But don’t forget about rodents, who love such storage facilities and can become a problem.
On pillars
Another option: make a chicken coop for 10 chickens on poles. In this case, 4 beams are dug into the ground at the corners of the building, the floor covering is made at a height of 50-80 cm from the ground level. The roof is made at a height of 180-200 cm. In general, this is a convenient option for a mini-chicken coop for a summer residence. This is more of a summer option, but can be insulated. In order for the bird to be able to get in and out, an inclined ladder is made from boards with thin perches nailed about 10 cm apart to make it easier for the bird to move.

In general, you choose the height and general construction plan at your own discretion.
Material for building a chicken coop
For chicken coop walls, the material chosen depends on the intended use. For a summer chicken coop, boards, plywood, and OSB are suitable. Such buildings are made according to the principle of frame house construction: a frame is assembled from timber, covered with boards or sheet material. The task of such buildings is to protect from the sun, wind and rain, and they do this very well.
For a winter chicken coop you can use the same materials as for a summer one, but the walls will have to be insulated. You can also use logs, timber, gas or foam concrete, adobe, cinder block, shell rock, sandstone, etc. Basically, any building materials. If there is material left over from the construction of a house, bathhouse, barn, it can be put to use. Only part of the material during the construction of a winter chicken coop requires mandatory insulation, while others can be done without (depending on the thickness of the wall, winter temperatures).

Boards, OSB, lining, plywood - these are the most popular materials for building a chicken coop
A chicken coop for 10-20 chickens is usually covered with inexpensive material. Most often it is roofing felt or slate, but any other material can be used. Only if you are planning a metal roof (from metal tiles, corrugated sheets), keep in mind that chickens do not like noise. During rain or hail, they may become frightened, which will affect the number of eggs or weight gain.
Insulation - mineral wool or polystyrene foam. Mineral wool is vapor-permeable, so normal humidity can be automatically maintained in the chicken coop (if the walls are also vapor-permeable). Polystyrene foam does not allow moisture to pass through, but it is cheaper and is used to build a budget poultry house. Just remember that mice love to live in such insulation (foam plastic and mineral wool). And this is a problem. To block their access to the inside of the wall, it is tightened on both sides with a fine metal mesh (cell size - the smaller the better).
There is also extruded polystyrene foam. It is much more expensive than the options listed above, but the advantage is that fungi do not grow in it, bacteria do not multiply, and insects and rodents do not like it. And one more thing - it has excellent thermal insulation characteristics and, to insulate a chicken coop, a thickness of 2-3 cm is enough (foam plastic needs more than 5 cm), so in fact, the cost of insulation will not increase very much.
Drawings and projects
A summer chicken coop for 10-20 chickens is a small building, usually made of wood. A mini poultry house with a walk, which will house less than a dozen birds, has dimensions of 3 * 1.5 m. Moreover, this is with a walk - a fenced off area. The very room where the chickens will spend the night and lay eggs is 80-100 cm deep, 140-160 cm wide, and its height is about 1 meter.

Summer chicken coop for 5-9 chickens with walking - a very small building
For maintenance - changing bedding, cleaning - there is a door in the back wall. There is a small window covered with shutters to let in light. In general, an ideal option for a summer house for seasonally keeping a small number of chickens.
A chicken coop for 10-15 chickens is a more serious building. Dimensions double: 1*2. The height can still be kept low - all servicing can be done through a door in the back wall. There is no need to go inside. Only as a last resort.

For an even larger number of birds, you need to make an even larger barn for chickens. This is really a barn or a shed. You can already enter such a room.

If the winters are snowy, you will have to make high slopes and a hip roof
Please note that even the smallest poultry house should have windows. No one will install metal-plastic, but glass must be present. In a seasonal chicken coop, one glass is enough; in a winter one, it is better to install two. Moreover, the second can only be installed in cold weather. And one more thing: it is advisable to have shutters on the window. This will give you the opportunity to change the length of daylight hours.
There are designs for chicken coops of unusual shapes - in the form of a triangle or a wigwam. This type of construction is optimal. By spending a minimum of funds on construction, we get a substantial area.

This chicken coop for 10-20 chickens is built using frame technology. There are no walls as such; they are covered with soft roofing material. A very rational construction. It is also suitable for snowy regions: with such an inclination, little will be delayed.
Chicken coop for 10-20 chickens: choosing and making a foundation
The type of foundation depends on the type of material chosen. If this is a frame building or timber or logs will be used, the most optimal is a columnar foundation. The costs in time and money are minimal, reliability is sufficient, and possible distortions of the columns are compensated by the strapping and elasticity of the material.

If the walls are built from blocks of any type, brick, shell rock and any similar material, a strip foundation is needed. There are more costs, but there is no other way to do it. An even better option is a slab foundation, but the costs are even higher. But the slab can be used as a subfloor, and with such a foundation any frost heaving is not a problem.
Preparing the site for the foundation
To build a chicken coop for 10 chickens with your own hands, first clear the area. It is necessary to remove all the fertile layer. Its thickness can be 20 cm or more, and maybe only 5. In any case, we remove everything, including stones, roots, etc. We level the area and compact it. For tamping, you can use a piece of large diameter log with a crossbar-handle nailed on top.

It is necessary to remove the soil because the animal and plant remains in it under the building begin to rot. So it is necessary to remove the fertile layer of soil. We carry out further construction work on the cleared and leveled site.
Columnar foundation
The foundation pillars for the poultry house can be made of brick, but the easiest way is to use concrete blocks 20*20*40 cm. They fit perfectly. If you are building a chicken coop for 10-20 chickens, it is unlikely that your structure will be larger. The longest side length that can be is 4 meters. If the winter is snowy, you can put three supports on this side: two at the edges and one in the middle. If the length of the chicken coop wall does not exceed 3 meters, we place only supports in the corners.
In the selected places we dig holes that are slightly larger in size than the future pillars. The depth of the holes is 25-30 cm. Pour medium-fraction crushed stone onto the bottom and compact it well. The thickness of the compacted layer is 15 cm. We pour sand onto the compacted crushed stone and tamp it well too. Blocks can be placed on this base. They need to be placed “on the horizon”. To do this, you can use pegs with a rope stretched along the level, or you can put even planks on the blocks, lay a building level on them and use it to navigate.

Once the blocks are aligned, you can begin laying the strapping. This is either a beam (for frame or timber construction) or a log. The strapping beam/log must be treated with impregnation. Under them, on the posts, it is advisable to lay a piece of roofing felt or waterproofing material folded in two layers (a modern and improved analogue of roofing felt). That's it, you can continue building the chicken coop.
Strip foundation for a chicken coop
A strip foundation is usually made for a chicken coop for 20 chickens, which will be built from any building blocks, adobe, shell rock, brick, etc. To make a concrete strip, you will have to dig a trench at least 50 cm deep and at least 35 cm wide along the perimeter of the future building. Try to make the walls of the trench even, and if the soil is loose, with a slight slope.
The bottom of the trench is cleared of stones and roots, leveled, and compacted. Crushed stone of medium fraction is poured onto the bottom, leveled and compacted. Layer thickness - 15 cm (compacted). Construction sand is poured on top and compacted. The thickness of the layer is about 10 cm. Next, formwork is assembled from boards in a trench for pouring concrete. The formwork panels should rise above the ground by at least 10-15 cm. In this case, the floor of the chicken coop will be slightly raised.

Strip base - for serious buildings or very difficult soils
To increase resistance to soil movements during frost heaving, reinforcement is placed inside the strip foundation. In this case, two rods with a diameter of 10-12 mm (ribbed, not smooth) are sufficient, which are located at a distance of about 15 cm from each other. The distance from the rods to the formwork panel is at least 5 cm. The distance from the bottom should be the same or greater .
The last step in constructing a strip foundation for a chicken coop for 10-20 chickens is pouring concrete. The grade of concrete is M150, it’s not worth doing less. The proportions are standard: for 1 part of M400 cement we take three parts of medium-fraction crushed stone and four parts of dry sand. Water - 0.7-0.8 parts. Mix everything and pour it into the formwork. Having leveled the top edge, cover the foundation with film and wait 1-3 weeks. If it is warm (+20°C and above) we wait a week, if from +17°C to +20°C - two, if less than +17°C - three. After which you can remove the formwork and continue construction.
Remember that the concrete foundation, even for a chicken coop for 10-20 chickens, must be waterproofed. It can be coated twice with bitumen mastic, or you can lay two layers of roll waterproofing. If the humidity in the area is high, it is better to use both.
Insulation and vapor barrier
The walls in the chicken coop are erected using the chosen technology. There are no nuances here. Insulation, in fact, too, but it’s worth talking about insulation, since after all, this building has its own characteristics.

Lay thermal insulation between two layers of sheathing - and here you have a winter chicken coop
Mineral (basalt or glass) wool
Insulation with mineral wool is most often done if a chicken coop for 10-20 chickens is built according to the principle of frame house construction. The assembled frame is sheathed on the outside, laying a layer of waterproofing under the material (plywood, OSB, boards). At the same time, please note that there should be a ventilation gap of 2-3 cm between the insulation and the outer skin. This can be provided by strips stuffed between the posts or stretched twine (secured with staples from a stapler). The second option is less reliable, but faster and cheaper.
To insulate a chicken coop with mineral wool, it is best to use hard or semi-rigid mats. They are cut into pieces of the required length and inserted into the spacer between the racks on the side of the room. It turns out that on the outside they rest against slats or stretched twine. The thickness of the insulation is 5-10 cm (depending on the region) and the material of the outer cladding, but in any case, when installed, it should not protrude beyond the racks. If the width of the racks is not enough, and thick insulation is needed, planks/boards are placed on top of the racks.

During construction, place the racks at such a pitch that the distance between them remains 3-5 cm less than the width of the insulation. Due to its greater width, the insulation will hold on (the elastic force works). Just be careful: measure the actual width of the roll, and do not use the number that is on the roll. There may be a difference of a couple of centimeters, the edges may bend, so as a result it will be difficult to install the insulation, as it will fall out. When insulating, try to ensure that the pieces fit together without gaps. If they do exist, fill them in thin strips. The installed insulation can be fixed using ordinary twine and staples made of.
A vapor barrier membrane is fixed over the installed insulation. In the simplest version, this is a film with a density of 200 microns. But it’s better to take a membrane for vapor barrier. It is attached to the posts with wooden planks, using small nails or staples from a stapler. At the joints, one sheet should overlap the other by at least 15 cm. Double-sided tape is used to glue the sheets together. This results in a double seam that provides a normal degree of protection against steam penetration. Internal cladding material (plywood, OSB, gypsum fiber board, gypsum plasterboard, boards) can be mounted on top of the vapor barrier film.

Why not an option? Also insulation... All that remains is to come up with something with the floor
So, when insulating a chicken coop with mineral wool, the wall pie looks like this (from inside to outside):
- internal lining;
- vapor barrier;
- insulation;
- ventilation gap;
- waterproofing;
- outer cladding.
The sequence of layers prevents moisture from penetrating into the insulation from the inside. This task cannot be completed 100% - vapors still penetrate. Therefore, it is necessary to have a ventilation gap between the insulation and the waterproofing. Due to this, the steam trapped in the insulation escapes. It is this construction that guarantees that the insulation will work.
Polystyrene foam and polystyrene foam
When insulated with polystyrene foam and polystyrene foam, everything is a little simpler. It is itself vapor-tight, so it is not necessary to protect it from steam penetration. If a chicken coop for 10-20 chickens is built on a frame principle, you can lay foam plastic between the posts. It is cut with a fine-tooth saw (for metal) and secured using polyurethane foam with low expansion. To prevent the insulation from leaking, strips are placed along the racks on both sides. You can lay polystyrene foam and expanded polystyrene both from the street and from the room. Sheathing can be done in any order. The only thing: on the street side, under the sheathing, it is better to fix the waterproofing. Especially for polystyrene foam - it “blooms” when exposed to large quantities of moisture.

If a chicken coop for 10-20 chickens is made of vapor-permeable material (foam and gas concrete, timber, logs), it must be insulated with foam plastic from the outside. There should be a ventilation gap between the wall and the insulation, which will allow moisture to evaporate from the wall. To do this, a lath 20-30 mm thick is stuffed onto the wall. Then the counter-batten is stuffed in the opposite direction. The thickness of the bars is no less than the thickness of the insulation. Foam plastic/extruded polystyrene foam is fixed between the counter-battens on the mounting foam. Then, on top, you can install the outer skin.
Ventilation
Chickens feel fine in normal humidity. When they fall or rise, they begin to hurt (high humidity is more dangerous), so ventilation in the chicken coop should creep in during the planning period. A hole is made in one of the walls for air flow. To do this, you can insert a piece of plastic pipe into the wall and select a cover for it.

The air outflow from the chicken coop (exhaust) is a pipe passed through the roof or the top of the wall. On the street, the pipe rises some distance above the roof and ends with a fungus or a canopy - for protection from precipitation and foliage. The supply and exhaust are located in opposite corners so that the air travels the greatest distance. This type of ventilation is called natural, but it does not always work stably.
For stable operation, a fan with a cover is embedded in the upper part of the wall. It's better if it has several speeds. The operation of this type of ventilation does not depend on the weather, but depends on the availability of electricity and requires human intervention. In principle, you can do both methods and use them as needed.