Convenient cage for rabbits: do it yourself. How to build a rabbitry with your own hands: step-by-step instructions How to build a rabbitry with your own hands drawings
It is simply impossible to keep rabbits without a good rabbitry! Summer, winter, portable, made of different materials, with different cage arrangements - there are now a lot of types of rabbit houses. How to decide among the variety of designs and build a good rabbitry with your own hands? We will talk about this in our article.
Rabbit farm: what should it be like?
In fact, there are few requirements for a room such as a rabbitry. It is important, first of all, to provide for the absence of drafts, the possibility of regular cleaning, lighting and comfortable cages. The remaining nuances are only an addition to the first three. At home, you can make a convenient rabbitry without spending much on materials. Of course, there are also spacious, insulated rooms that are built specifically for a large number of cells.
Rabbits are usually kept in insulated rabbitries, as in the photo in the gallery, if there are a lot of them, and production has been established for a long time. If you still keep a small number of long-eared rodents, you are probably wondering how to build a rabbitry with your own hands as quickly as possible.
Opt for lightweight construction made from wood, metal mesh, and other inexpensive materials. This option for a rabbit house is suitable for all beginner rabbit breeders. If desired, it can be stored in a barn for the winter.
Rabbit house design
So, if you decide to equip a room for rabbits, you need to decide on the number of cages and the type of their placement. It is necessary to allocate space for construction, cutting timber and other work. After which we calculate the size of each cage based on the number of rabbits and build a rabbitry. For one female rabbit with offspring or for 3 adult rabbits, you will need a cage with dimensions 70x70x50 (LxWxH).
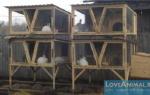
The structure of the cage is simple - the back wall should be opaque, the floor should be solid, with a mesh strip behind the cage to drain manure and urine. The front and side walls should be made blank, the cage door should be made of mesh. The structure of the cage floor can be entirely mesh or lattice, but then you need a manure tray under each house. Cells can be placed one at a time or in tiers. Usually they choose tiered placement, this saves space for the rabbitry.

Feeders and drinking bowls must be made in each cage, but when kept outside in the summer, the haybox is placed directly outside, as are the drinking bowls. The area with the cages can be fenced off, and then the rabbits can roam. For the winter, rabbit houses can be brought into the barn, and the hay barn and drinking bowls can be hidden in the same barn until next spring. It is better to make the structure on legs. This is necessary so that the rabbits do not stay close to the ground and do not catch a cold during the cold season.
The height of such support legs is at least 20 cm. In addition, these supports will make it easy to lift an empty rabbit coop. This is very convenient if you decide to take it outside during the warm season. The following video shows what an almost completed but not yet inhabited rabbitry looks like, made from wooden beams, plywood and mesh.
How to make it yourself?
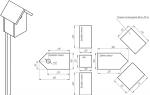
To understand how to build a rabbitry with your own hands, you will, of course, need drawings or at least a diagram of the future structure. You can take ready-made schemes, or you can do everything based on the number of rabbits on your farm. The cage, depending on which rabbits will be in it, can have different sizes. For example, for a rabbit and offspring you need a large cage with a queen cell and a light part. These structures may differ in appearance, but their principle is the same, see photo for an example.

The dimensions of the removable queen cell are approximately 40x70x60 (WxLxH), the light part of the cell is 70x70x50 (these dimensions may vary slightly for each farmer, this is normal). The queen cell is not equipped with a drinker and feeder; they are placed only in the light compartment. The floor of the main cage is made of lattice or plywood with a mesh back (its width is 15 cm). In the queen cell, the floor must be made solid.
Adult male rabbits or replacement young animals are kept in cages measuring 120x70x50 cm. Pregnant or fledged females are kept with their offspring separately from other individuals. The following video will tell you in detail about the structure of the case with the queen cell.
Materials and tools
If we are building a rabbitry from wood and inexpensive materials at hand, we will need the following:
- wooden beams, boards, slats;
- metal corners, pipes;
- wall cladding (iron, tin, OSB boards, flat slate);
- roofing material (polycarbonate, slate, ondulin, linoleum);
- mesh for the floor, walls, hay barn, door (with 40 mm cells);
- hinges, latches, screws, hammer, nails, screwdriver, screwdriver.
Frame and its assembly
To build a rabbitry with your own hands, you need to start with a frame. It is knocked together from wooden beams or welded from galvanized corners. Many farmers prefer timber because it is lighter and cheaper. The frame is made based on the number of cells, the dimensions of the timber are 45x45 mm. Then the frame is filled with ready-made sections from the mesh on the frame. This way you will literally assemble your structure piece by piece.

The mesh sections of the floor are covered with plywood on top to prevent rabbits from trampling their paws. This plywood is periodically removed, washed and dried. Rabbits cannot tolerate drafts, so we make the back wall of the rabbitry solid - from OSB, plywood or polycarbonate. When the frame is assembled, the doors and hay barn are made. Using self-tapping screws and hinges, the doors are attached to both compartments - the queen cell and the main one.
Then the mesh for the hay barn is cut. Regardless of whether we build a rabbitry indoors or outdoors, we must cover the structure with roofing material. Metal is not used for the roof, as it gets very hot in the heat if the structure is located on the street. We cover all protruding parts of the assembled structure with sheet metal.
Feeders and drinkers
When we build a rabbitry, it is important not to forget about the convenient location of feeders and drinkers. The length of the feeder is almost the entire length of the door, the height is at least 10 cm for an adult rabbit, for one head of young animals - 5-7 cm. The height of the feeder from the floor is approximately 10 cm. Where we keep a female with cubs, we place a feeder of at least 40 cm long.

Feeder standard: metal profile 40 cm long, 4 cm wide and 4 cm deep. The narrowness of the feeder does not allow babies to climb into it and contaminate the food. Feeding containers can be movable or fixed. Movable ones are usually attached from the outside, and are filled without opening the door. The immovable ones are hung inside.
There are a variety of drinkers, but experienced rabbit breeders are very fond of bottle drinkers. They are also perfect for beginners, as they are simple and cheap. The water tank is based on a plastic bottle with a hole in the lid from which water slowly flows out. You can understand how such a drinking bowl works by watching the video below.
Photo gallery
Wooden stationary rabbitry
Multi-tiered outdoor house for rabbits
Insulated rabbit house for winter

Video “Step-by-step construction of cells”
Video with detailed instructions for collecting cage frames for the future rabbitry.
For rabbits to grow and reproduce quickly, it is necessary to provide them with comfortable conditions. It is important to know how to properly build and equip a house for maintenance.
Having a sufficient amount of necessary information and minimal experience in construction, it is not difficult to build a rabbitry with your own hands.
How to choose a place
When choosing a site for the construction of a rabbitry, the following factors are taken into account:
- Distance from residential and commercial buildings by 15 m or more.
- Flat surface. It is preferable to choose a hill with a slight slope or a flat surface. The soil should be dense enough to quickly absorb water.
- Availability of protection from drafts and winds (trees, bushes, fences), otherwise consider installing an additional barrier.
- No noise.
When choosing a place for a rabbitry in a pit, the following is important:
- groundwater flow level: it should be below 1.5 m from the surface;
- no accumulation of rain and flood waters;
- the presence of shade, barriers to sunlight;
- soil quality: it is advisable to choose clay soils in which rabbits cannot dig long holes; sandy or rocky soils are absolutely not suitable;
- Smooth surface.
Common designs of rabbit hutches and their features
Most breeders prefer closed structures equipped with:
- ventilation;
- heating;
- artificial light.
Sections for separate living of animals are installed in rows in the room. Each section is equipped with facilities for food and water.

Depending on the number of animals, rabbitries are divided into types:
- single;
- from 2 sections;
- single-tier;
- multi-tiered.
Some breeders set up a walking area near the exit from the house, limiting it on all sides with a high mesh fence.
Multi-tiered mini-farms
Mini-farms are a single structure consisting of several sections located in several rows above each other. They can be placed directly outdoors or inside an outbuilding.
, since they allow you to grow the largest number of individuals in a minimal area. Mini-farms are also suitable for northern regions, but for the winter they are moved inside the building.

Features that are taken into account when building a mini-farm:
- the bottom row must be raised 1 m above the ground (installed on legs): this allows you to retain heat;
- ventilation of the 2 upper tiers occurs naturally;
- on the lower tier, where there is less air movement, artificial supply and exhaust ventilation is required.
Organization of a rabbitry in a pit – the most cost-effective option, the main thing is to choose the right place.

Main stages of construction:
- Digging a hole of the required size. For example, a hole of 2x2 m will be required. Its depth should not be less than 1.5 m, otherwise the rabbits will be able to dig a hole to the surface of the ground and escape.
- Ventilation. A pipe with a diameter of about 15 cm is installed through the roof.
- Organization of the floor. The bottom is covered with sand, then a mesh or slats are laid. The top layer is drainage (for example, dry straw), which must be changed as it becomes dirty.
- Protection of walls from destruction. 3 walls are lined with bricks or covered with durable material, such as slate. The 4th wall remains partially open so that the rabbits have the opportunity to make a hole in it.
- Pit lighting. They conduct electricity or move the roof back to allow light to enter.
Sometimes rabbits do not dig a hole (loss of instinct after a year of living in other conditions), in which case the owner himself must start digging it with a shovel. The hole is dug at a height of 15-20 centimeters from the floor; its width should be enough to accommodate 2-3 rabbits.
All-season option with insulated compartments
Comfortable conditions in winter are ensured by additional insulation of the compartments. The most affordable insulation is polystyrene foam; this material crumbles easily. The foam is laid on the outside of the back and side walls so that rabbits cannot reach it and gut it.
In the pit, the walls are insulated with straw, which is placed between the slate and the soil.
Basic principles to follow when setting up a rabbitry
Housing for rabbits must meet the following requirements:
- Suitable temperature conditions. In winter, the temperature should not fall below 0 0C. At +14…+16 0C animals actively develop and reproduce. The minimum temperature in the queen cell is +10 0C.
- Moderate lighting for 16-18 hours. Lack of light when rabbits are kept indoors leads to a slowdown in reproductive functions, development and weight gain, and a decrease in the animal’s immunity. With prolonged exposure to direct sunlight, pets develop hypothermia, mucous membranes and eyes become inflamed. When kept outdoors, the rabbitry is placed in the shade or a special canopy from the sun is arranged over it.
- Air ventilation. A special air inflow and outflow system is necessary when closed or on the lower tier of the mini-farm.
- Strength. The structure must be strong, this must be taken into account during construction.
- Presence of nests. In the queen cell it is necessary to make a container for nesting or a separate nest with an exit.
In cages, the rear and outer walls on the sides are made of opaque material. Intersectional partitions, front walls and doors are installed from mesh. A metal or wooden mesh is laid on the floor, and space is left for a tray to collect feces and leftover feed.
On the outside, a drinking bowl and a feeder are attached to each section.
Size selection
What to consider when calculating the size of your rabbitry:
- and her living with the rabbits until they are 20 days old. A separate nest with dimensions of 40x40x30 cm must be made in it.
- A young animal requires a minimum of about 0.1-0.2 m2 of space, comfortable living - 0.5 m2.
- The living compartment for an active male should not be less than 1 m2.
Minimum dimensions of a standard cage of 2 sections:
- length – 1.4 m;
- width and height – 0.5 m each.
The values given are for common rabbit breeds. Larger specimens require larger sections.
Tools and materials
When making a rabbitry, a standard set of tools is used:
- drill;
- hacksaw for metal or wood (depending on building materials);
- drill;
- welding machine, if the frame is supposed to be assembled from metal corners.
Materials for construction:
- wooden blocks or metal corners - for constructing a frame;
- stainless steel mesh or wooden slats for the floor;
- thick boards - for side and rear walls;
- fine mesh – for intersection partitions, front walls and doors.
- roofing felt or slate, boards - for roofing;
- corners, fasteners - for fastening units.
Example drawings of a rabbitry with dimensions

The space between the sections is called a hay barn; green fodder is placed there.
Original ideas for implementing a rabbitry
Experienced rabbit breeder Zolotukhin offers a number of interesting ideas:
- Combined floor. Consists of 2 parts: the front is a slightly inclined surface made of flat slate, the back is a mesh surface. As a result, waste products will slide along the slate onto the grate and fall through it into a special tray. This solution greatly simplifies the process of cleaning the floor and increases living comfort.
- Rotating feeders. Advantages - the ability to turn in the right direction.
- Automatic water and feed supply.
Insulation
In regions with cold winters, it is necessary to provide additional heating for the rabbitry.
There are several options:
- At the bottom of the compartment, a “pocket” is made of plywood, into which an electric heating pad is installed. Periodic activation of the heating pad at minimum mode is ensured by a transformer.
- Heating and simultaneous lighting are provided by infrared lamps.
- 1.5 kW heat guns are useful; in severe frosts it is enough to turn them on at night.
- You can install radiators, to which heat is supplied from a residential building.
Feeders and drinkers
Rabbits are active, so feeders and drinkers should be placed on the outside of the cages and should be closed.
The design of feeders may vary. For dry food, options made from wood materials are suitable, but stainless steel feeders are also suitable.

Experienced rabbit breeders prefer bunker-type feeders, the contents of which are enough for the animal for a day.
You can make a convenient drinking bowl yourself.
Assembly order:
- Make a through hole (diameter 2-3 millimeters) with an awl or nail in the neck of a 0.5 liter plastic bottle.
- Pour water into the bottle and screw on the cap.
- Take an oblong container (a can of sprat or yogurt), place the bottle in it with the neck down.
- Secure the structure to the front wall using pliers and wire.
A wide selection of high-quality drinkers is offered for sale, they come in 2 types : nipple and cup.

To prevent poisoning and disease in rabbits, the water in drinking bowls should always be clean. Feeders should also be washed regularly.
Nuances in making a rabbitry
Important tips when organizing a rabbitry:
- When building a frame, you should not skimp on screws and corners; fasteners ensure the stability of the structure.
- Plywood and OSB are not suitable for rabbitry walls; animals quickly chew through such materials. Otherwise, they should be covered with metal sheets.
- The inner surface of the rabbitry must be safe: nails, sharp objects and cutting edges must not protrude, as animals can be injured by them.
Step-by-step instructions for creating a rabbitry for beginners
How to make a rabbit hutch:
| No. | Step | Photo |
| 1 | Assemble the floor. Assembly order:
There should be a metal tray under the floor that can be removed and cleaned of urine, droppings, and food residues. |

|
| 2 | To obtain the back and side walls, sheath them with thick wood or metal sheets. To observe animals, lattice windows can be inserted into the side walls. | 
|
| 3 | Organize sections. Install and secure internal partitions | 
|
| 4 | Make a feeder from stainless steel and wood | 
|
| 5 | Install a front wall made of wooden slats or metal mesh, equip a drinking bowl and feeder | 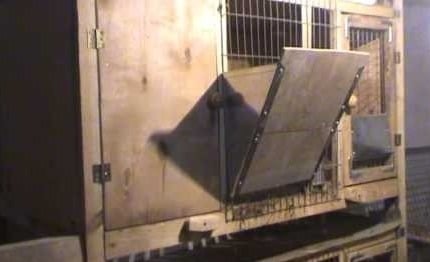
|
| 6 | Make a door measuring 25x40 cm in the form of a wooden frame, inside of which a mesh is stretched. Secure the door on 2 hinges, close it with a latch | 
|
| 7 | Erect a sloping roof (for water drainage) with a canopy about 25 cm wide | 
|
Conclusion
Having decided to independently build a house for rabbits, you must first find out what conditions these animals require for rapid development and reproduction.
In unfavorable conditions, growth slows down, individuals stop reproducing and become weak.
2017-08-17 Igor Novitsky 
Although the rabbit can hardly be called an exotic animal for Russia, in the meat and meat products market, rabbit meat makes up only a small percentage of the total mass. Most farmers do not want to get involved with these farm animals because it is believed that rabbits die like flies at the slightest provocation. However, in fact, all problems stem from improper living conditions and errors in the formation of the diet. By choosing the right feed and building a modern, high-quality rabbitry, you can successfully develop your rabbit business.
Before you build a rabbitry
Any construction begins not with drawings and cost estimates, but with defining the goals and objectives for which the structure is being built. In our case, we first need to give clear answers to the following questions:
- How many animals will be kept at one time? There is a fundamental difference between a farm for a dozen animals and a farm for 200 rabbits.
- Where exactly are the cages planned to be placed - on the street; under a light canopy that barely protects from the sun, rain and wind; or in a warm barn?
- Will automatic water and food supply and waste removal systems be introduced?
- Should cages be portable or stationary?
Only by answering these three questions can you begin to design and begin building a rabbitry. Now we know whether we can get by with three hastily assembled portable cages, or whether we need to build a whole rabbit town, which will be served by semi-automatic mechanisms or living people.
By the way, if you plan to breed rabbits in large quantities and sell the resulting products, you will also have to coordinate the construction with government services.
Place for a rabbitry
There are no particularly strict requirements regarding where on the site to place the rabbitry. The main thing is to adhere to the self-evident rules, ignoring which will inevitably lead to the loss of livestock.
Firstly, to build a rabbitry you need to choose a dry place. Wetlands or frequently flooded areas are not suitable. Excess moisture will not only accelerate the corrosion of building materials, but will also create an unhealthy microclimate around the rabbitry. As a result, the cells will wear out faster, and the mortality rate among animals will be high.
Secondly, try to place the cells with their “backs” to the windiest direction (usually north). Rabbits do not like drafts or wind, so it is better to protect them as much as possible from these natural phenomena. If possible, there should be dense trees or shrubs around the rabbitry that can soften strong winds.
Thirdly, the rabbitry should not be exposed to direct sunlight all day. In winter it may not be bad, but in summer the cages will be a real oven. Especially in the southern regions. If it so happens that you have got a completely “bald” area without trees that could cast a shadow on the cages, then either build a rabbitry indoors, or erect at least a light canopy over them (you can even just use spruce branches or brushwood), which would save from the scorching sun.
And again, we remind you that if you plan to raise rabbits for sale, you will have to build a rabbitry taking into account existing official building codes for such structures.
Ready-made Mikhailov rabbitries
Thanks to the Internet, the general public has become aware of two of the most successful designs of rabbit hutches, which are now used by many professional farmers. We are talking about rabbitries according to the schemes of Mikhailov and Zolotukhin.
Mikhailov's rabbit hutches are a two- or three-tier structure, where the upper tiers are occupied by residential sections, and on the lower tier there is a sealed manure collector. There are several models of these cages (for young animals for fattening, for pregnant rabbits and rabbits with rabbits, for adult males), but they are all united by a common idea - the presence of a built-in sealed container common to all sections of the cage, where manure accumulates.
The rabbit hutches of this design have a solid back wall, while the other three are mesh. The unit also has a built-in ventilation system, heating of drinking bowls and queen cells.
Another key feature that modern Mikhailov rabbitries are famous for is the maximum automation of all processes. Manure is removed from the cage and accumulates in the container on its own. In this case, the smell does not penetrate into the living compartment. The cages are also equipped with self-feeders and automatic drinkers. That is, you really only need to maintain the cage once a week - remove manure from the storage tank, pour food into the feeder and change the water canister.
The disadvantage of Mikhailov cells is that they need to be bought (and for a lot of money), since you can’t make them yourself. At best, this will be a simplified copy. This will be a good quality cage, but you will not achieve the results that can be achieved with a real rabbitry with a homemade one. In addition, raising rabbits in cages designed by Mikhailov also requires a special method.
General design and diagram of the rabbitry
Zolotukhin's rabbitry is a simpler design that you can successfully assemble yourself. Most farmers who make their own cages mainly use this design, making changes to it to suit their needs.
The Zolotukhin rabbitry also has a self-removal system for waste, which consists of a special floor design. Instead of the usual horizontal arrangement, flat slate or plywood is laid at an angle so that feces and urine roll under the back wall. There is a gap of 15-20 cm between the floor and the wall, covered with a metal mesh.
Living compartments can be arranged in two or three tiers, but for the automatic waste removal system to work, each subsequent tier must be moved back relative to the bottom one by the width of the mesh at the rear.
In its standard form, the cage has two living compartments on each tier, but that’s what makes Zolotukhin’s design so good: by making a rabbitry with your own hands, you can easily make modifications to the original design. If desired, you can mount a long cage with a dozen compartments on each tier. True, then they can no longer be moved from place to place if necessary.
The back and side walls of the rabbitry are made blank to minimize heat loss. The roof is a regular pitched one for the street or flat when placed under a canopy (or indoors).
The dimensions of the rabbitry are:
- width - 1 meter per residential section;
- height - 0.5 meters per section plus 30-40 cm between the floor/ground and the lower tier;
- depth - at least 70 cm for the compartments of the lower tier (the upper ones are deeper due to the extension of the rear wall);
- floor slope - 10-15 degrees;
- The width of the mesh at the back wall is 15-20 cm.
The proportions of the door and mesh window on the front side of the cage are chosen at your discretion.
Feeders, drinkers and other small items
Before making a rabbitry, consider a feed and water supply system. Since rabbits require both grass/hay and grain feed, the cage needs to have both types of feeders.
The feeder for bulk food according to the Zolotukhin method is mounted directly into the cage door so that 1/3 of the total volume of the container is inside. It is proposed to make the feeder in the form of a tray or hopper with edges of unequal height: the side with the lower edge should be inside the cage, and the side with the high edge should be outside. The sizes of the feeder are selected individually, but the general recommendations are as follows:
- high edge - 15-20 cm;
- low edge - 5-7 cm;
- width - 5-10 cm;
- length - slightly less than the door itself.
The bunker for hay and grass is made according to exactly the same principle, only it is placed on the “window” and has a much larger size. There is also a difference in the materials used. Obviously, for bulk feed you need solid material - wood, tin, plexiglass, etc. But the hay barn is made from rabbit mesh.
To supply water, of course, it is better to use a nipple system, but for this you will have to spend money on purchasing it. To save money, you can construct a primitive cup drinker from scrap materials. However, it is important that the design of such a drinking bowl meets three requirements - it is minimally exposed to contamination, is easy to clean, and is not tipped over by the rabbit itself.
It should also be noted that in Zolotukhin’s cells there is no stationary queen cell. The female rabbit is simply placed in a wider compartment, in which a portable house-hole is placed in the winter (it must be securely fixed in the cage), and in the summer a large armful of hay is placed, where the female makes a nest. In this way, natural conditions for animals are simulated.
Materials for rabbitry
When constructing cages, you can use any available materials, but wood is best suited. It is environmentally friendly, readily available and easy to process.
The cage frame can be constructed from wooden beams or metal corners. The walls and floor of the rabbitry are made of boards or plywood. The outside can be sheathed with tin, but the inside must be wood. Zolotukhin does not recommend making mesh floors, since, according to him, rabbits suffer a lot when they are forced to move on a mesh floor. Use the mesh only at the back wall, where feces and urine roll off.
The roof is made either from the same boards or plywood, or from ordinary slate. The front of the cage has a large window and door. If the door is made of boards or plexiglass, then the “window” itself is made of mesh. Material for making feeders and drinkers - depending on the circumstances.
By the way, it is better to make the floors removable so that they can be removed and washed periodically. Of course, for this, the front section or roof must also be removable so that the floor itself can be removed.
If you wish, with a minimum investment of time and effort, you can build a cage for rabbits yourself. It is enough to choose the most suitable design, purchase materials, develop a diagram, or take a ready-made one from the Internet.
Do-it-yourself production of rabbit hutches is a profitable alternative to the expensive services of craftsmen, since the basis of the design can be improvised materials.
The first thing you should pay attention to when making nurseries is the design. The parameters and quality of the final construction will depend on the chosen design.
There are several types of rabbit hutches:
- single-tier;
- two-tier;
- three-tier;
- multi-tiered;
- monolithic;
- portable;
- shads;
- nurseries in Zolotukhin, Tsvetkov, Rabbitax.
Nurseries differ in materials (wood, plywood, metal profiles) and the breed of pets. In the latter case, rabbitries are allocated for female rabbits and rabbits, for decorative breeds, dwarfs, etc.
Nurseries are designed for warm and cold seasons; for this purpose, special seals are installed in them, and the buildings are closed from precipitation.
How to make cages for rabbits with your own hands?
For rabbit breeding, it is enough to have a durable cage with insulation at home.
When building nurseries, the following rules and recommendations must be taken into account:
- Place animals of the same species, gender, weight and characteristic habits in one cage.
- Place individuals with offspring in buildings with two compartments and tiers.
- Standard parameters for nurseries: length about 80-120 cm, height about 50 cm, width about 70-80 cm.
- It is better to keep young animals together with everyone else in a group compartment.
- The number of rabbits in one cage is calculated based on its size.
Location

It is worth deciding on the location of the rabbitry before moving on to the construction stage, since it is then difficult to move it. The place should be protected from drafts, wind, and sun.
It is especially important to choose the right place for construction if it will be located outdoors.
Important! If the nursery is located outside around the clock, it is important to take care of roofing materials. It is best to exclude the use of metal for the roof; it is worth taking denser and heat-resistant materials. Wood or slate will do.
In this case, it is better to make a wooden floor with a retractable tray, which is covered with grating on top. The front and rear walls of the rabbitry are insulated with foam plastic, and a heated floor is installed for the winter.
What materials are most often used to make cells?
Rabbit farms are divided into types according to the material used for production.
When making your own at home, you use available materials:
- wood;
- slate;
- corrugated sheeting;
- brick;
- metal profile.
Additionally, insulation, plaster, and sanding will be required. Often a rabbitry consists of a wooden frame and a solid wire mesh, which serves as a door and is equipped with latches and curtains.
Stages of creating a cage for rabbits
The construction of a two-section rabbitry takes place in the following stages:
- Frame assembly.
- Wall upholstery with plywood sheets.
- Laying the floor.
- Mounting walls between zones.
- Installation of doors, queen cell.
- Installation of a nursery.
Final stage – installation of feeders and drinkers, covering the floor with branches for the convenience of pets.
Cage frame
For home-made frames, a solid wooden beam is often used, which is sheathed on top with wood, oriented strand board or slate.
The frame is assembled according to a pre-prepared scheme; it is recommended to pre-treat the timber with an antiseptic. To secure the beams, self-tapping screws of different sizes are used (from 25 to 75 mm).
Note! Since rabbits are rodents, they like to chew on wood and can wear down the interior, so it is recommended to line the cage with metal or slate.
After assembly, the top frame can be painted with a special primer paint. If the cage is located outside all year round, it is recommended to install it on wooden beams-legs. The optimal length of the frame legs varies from 80 to 100 cm. For a nursery located indoors, legs 30-40 cm long will be sufficient.
Roof installation
Depending on the chosen design, various roofing materials are used for the manufacture and installation of the roof. Often, the roof for rabbit hutches is made from layers of slate.
Installation of slate sheets involves creating a certain angle of inclination. Since the frame is usually made of wooden beams, it is important to mount the roof in such a way that its edges do not extend beyond the frame by more than 5 cm. This way, the frame of the cage structure will be reliably protected from precipitation and rotting.
Slate leaves are attached to each other using nails with wide heads or self-tapping screws. Some designs of internal cages provide for the installation of a roof in the form of a simple galvanized mesh.
Queen cell arrangement
It is a special structure for the female rabbit, necessary to ensure maximum offspring. This is a special design that separates the common nest from the environment where the rabbits will be.

For this purpose, plywood sheets, boards, slats, hinges and insulating material are used, which is most often ordinary sawdust.
The process of installing a queen cell does not require much effort and skill. The frame itself is made according to a ready-made design, slats are used for edging, a blank is knocked together, insulated and a layer of plywood is stuffed on top. It is important to ensure that there are no gaps during manufacturing. The finished walls of the frame are fastened with self-tapping screws.
Feeder device
Feeders for long-eared pets can be purchased ready-made or made with your own hands. Drawings can be found on the Internet or prepared yourself.
There are different types of feeders depending on materials, shapes and designs:
- ceramic bowls;
- nursery feeders;
- gutters;
- bunkers;
- cup-shaped feeders.
To make a feeder with your own hands, you use tin, wood, metal profiles, plastic, slate and plexiglass. The choice of material depends on the type of cell and its location (inside or outside).
You can also make a feeder from scrap materials (for example, from a tin can). The feeder is installed inside the nest. When making your own, it is important to ensure that the feeder does not have sharp corners, edges or jagged edges.
Types of cages for rabbits, drawings, dimensions, description
There are different types of cages based on parameters such as the breed of rabbits, living conditions, and size. Based on general parameters, external and stationary types of cells are distinguished.
The most extensive classification is the division of cells according to the breeds of inhabitants:
- General/group– represent a large nest designed for different numbers of rabbits (from 10 or more), the size varies from 60 to 120 cm. The design includes several sections for pets of the same weight, age, and temperament.
- Individual– a house for one adult pet is suitable for demanding and pugnacious males who need personal space.
- Queen cells– houses for female rabbits with their babies. Usually they are installed inside a group nest in the form of a box; they are a closed space with one opening.
- Sheds– a compact design with two tiers and sides, the cages are adjacent to each other with their back walls, this design comes in different sizes, it is used for young and adult pets.
- Individual designs by Mikhailov, Zolotukhin, Tsvetkov – The designs, developed on an individual basis according to the personal drawings of the creators, are distinguished by ergonomics, simplicity and compactness.
Cells from Zolotukhin: features and advantages
The famous rabbit breeder Nikolai Zolotukhin has developed his own cage design for long-eared pets, which is easy to manufacture and provides maximum protection for animals from external negative factors.
Typically, such a cage involves the construction of two floors and accommodates 3-6 adult pets.

The distinctive advantage of the rabbitry is its security, the inclination of the feeder, and the practicality of cleaning.
Its standard sizes:
- width – 2 m;
- height – 1.5-2 m;
- depth – 60-80 cm;
- back mesh – 15-20 cm;
- door – 40x40 cm.
The cage design according to Tsvetkov involves a two-tier mini-farm with 4 cells. Such a cage is equipped with hanging feeders and drinkers, in which the water is automatically heated, and mounted queen cells.
Among the design features of A. A. Tsvetkov are:
- two-tier device, 2 compartments per tier;
- the cage is designed for outdoor living;
- the presence of bunker feeders and automatic drinkers;
- availability of ventilation and purification systems.

Sawdust, polystyrene foam, peat or tree bark are used as cell insulation. Roofing material or slate is used for roofing. The frame of this design is made of solid wooden beams, painted with white paint, insulated and protected with sheets of plywood.
- the simplest and most affordable option, made from metal mesh. Such a cage differs significantly from a wooden one in terms of practicality and cost-effectiveness.
It does not require regular maintenance and repair, is highly durable, and prevents damage to the material by pets. To manufacture the structure, solid metal wire with a diameter of 1.5-1.8 mm and a cell size of 12x50 mm is used.

Important! In a metal cage, the common nest must be separated from the feeder section by a partition covered with a thin layer of metal.
This design is arranged rectangular or square and eliminates the possibility of sagging of the material.
A cage made of metal mesh is suitable exclusively for indoor use, because in the winter the metal cools down and in the summer it heats up, which negatively affects the condition of the pets.
A small cage excludes the establishment of a queen cell, which makes it suitable only for breeding males. The compact design is spacious and consists of 2 tiers that can accommodate up to 8 adult residents.
The compact cage does not take up much space, but is open, so it is only suitable for arrangement in the summer or indoors.

In compact type cages, it is impossible to put hay without lifting it onto a ladder. This cage requires frequent cleaning due to its open design and rapid accumulation of waste in the lower tiers.
The simplest design
To manufacture the simplest design, no additional materials or special tools are required. It consists of 2-3 tiers and can accommodate up to 8-9 pets.
However, this design has more disadvantages than advantages. It does not have the ability to install a nipple drinker, there is no section for hay, it requires regular cleaning and the installation of an internal feeder.

Do-it-yourself two- or three-tier cage for rabbits: step-by-step instructions with photo examples
A two-tier cage is the most common and simplest design.

A two- or three-tier cage is installed as follows:
- Make a frame structure from bars 70 cm high and 120-150 cm long.
- Insulate the finished frame with plywood sheets.
- Referring to the drawing of the cage, leave space inside for arranging a common nest and.
- Install the nest and queen cell.
- Install partitions between the nest and feeding area.
- Install a slate roof and install hinges for easy access.
- Install a wooden door in the nesting compartment.
- Install a metal mesh door in the aft compartment.
- Lay the floor from wooden slats and cover it with a fine metal mesh on top.
- Place the bottom tray under the cage.
- Place insulating materials (hay, sawdust, polystyrene foam).
- Install a feeder and drinkers.
Features and advantages of the design
Two- and three-tier cage designs are considered the most convenient and profitable for breeding pets. The cage is designed with maximum comfort for the animals; inside there are feeders for feed, hay and fruits.
The design does not require regular cleaning and allows you to keep the compartments clean when keeping up to 25 adult pets. There is a separate compartment at the bottom for the mother and baby rabbits.
It is not difficult to make high-quality, reliable and comfortable cages for rabbits with your own hands at home. If you have the necessary materials, you can build a practical mini-farm that will serve as a home for your pets for many years.
In order for the cage to perform its functions and bring maximum benefit, it is recommended to choose the type and design of the rabbitry, taking into account the breed, age and weight of the individuals. Comfortable living conditions will help raise healthy, strong and active animals without diseases or behavioral defects.
The rabbitry is a convenient design designed for all types and breeds of rabbits. Made from wood. May be lined with iron. When building it yourself, it is recommended to raise the structure 1 m above the ground.
Primary requirements
 An entire farm for several hundred heads, special sheds, cages for outdoor or indoor keeping can be designed for production. Regardless of the conditions in which the animals will be kept, it is necessary to take into account physical indicators, breed, age and gender. The future design should be easy to manufacture. Permanent requires examination, disinfection, feeding. An inconvenient rabbitry should not negatively affect the health of the animals. Therefore, it should be made as spacious and comfortable as possible. Correct fulfillment of certain requirements will reduce maintenance time and make maintenance less burdensome.
Selecting a location
Before starting construction, it is necessary to select a location on the plot. During the daytime, the area should be shaded from direct sunlight. It is best to make sure that the rabbitry is located on a hill with your own hands. Cold gusts of wind, stale and damp air should not be allowed to appear. The rabbitry should not be located next to a compost pit. This will lead to the gradual extinction of individuals or the entire population. It is also not recommended to build a house for rabbits next to a dog’s enclosure or other sources of noise.
Design
The structure of the building must be durable. That's why you need to choose only good, strong materials. The future house must be raised by at least 1 m; before construction, the drawings must be carefully completed and a location on the site must be selected. Also, the animal house must have ventilation.
Optimal sizes
Professionals have developed the required cell sizes. The width and length of the structures vary depending on what animals they are aimed at.
How to keep a couple of rabbits
For two adult animals, a warm room with two sections should be built. Required sizes:
- Length at least 140 cm;
- Width at least 60-70 cm;
- Height 50-70 cm;
Fresh water should also be placed around the edges of the structure. It will be very difficult for rabbits to climb into the feeders with their paws. An inclined mesh must be placed between the sections. Hay or green fodder is placed in its frame. The internal part of the structure is called the hay barn. In order to save space, you can make two or three tiers stacked on top of each other. But it is worth considering that artificial ventilation will be needed in the lower structure. The last two tiers can be managed by natural air circulation using the wind. Such cells will be compact and convenient. They are easy to add food to and clean up.
Group keeping of young animals
- Recommended length 200-300 cm;
- Width 80-100 cm;
- Height not less than 35-60 cm;
Such structures are intended for keeping young animals no older than 2 months. It is necessary to calculate the volume of dwellings based on the number of livestock. One individual will need a space of 0.12 square meters. m.
Female and newborn rabbits
 A female with needs at least 0.6 square meters. m, there should also be a nesting container in the cage. Recommended container sizes:
- Length at least 34-36 cm;
- Height 30-32 cm;
- Width 25-28 cm;
Video by Pavel Tverikin
- The tree protruding inside the house, the passage in the partition, which should separate the walking compartment and the queen cell, should be carefully lined with tin. Thanks to this design, animals will not be able to destroy the walls.
- When installing the cage outdoors or under a canopy, it is necessary to place the container above the wooden floor. Only after this is a metal mesh and ladder laid on top. Thanks to this, in winter, when the compost decomposes, additional heat will begin to be released. The temperature in the rabbitry will rise. The animals' stay in the cage will be more comfortable.
- If the livestock breeder is a beginner and is making a rabbitry with his own hands for the first time in his life, then in this case, professionals recommend using wood waste and waste material. When purchasing new heads or when offspring appear, the need for new cages will arise. The experience gained will help you design a structure from high quality building materials. During subsequent construction, the material can be used most rationally.
Rabbits and rats
After you have built a rabbitry with your own hands, you should remember about the occurrence of wild rodents. Rats are considered carriers of bacteria and various infections. These animals can cause irreparable harm to adults and their offspring. Therefore, it is necessary to ensure that rats do not bother the rabbits. To do this you need:
- Do not scatter food throughout the rabbitry;
- Carry out thorough mulching and weeding;
- Garbage must be removed throughout the entire area. This is especially true for the territory where the rabbitry is located. Rodents can make burrows in garbage and waste. Such proximity to rabbits is extremely unpleasant;
- The rabbitry should be cleaned, disinfected and repaired.
In addition to spreading infectious diseases, rodents can eat newborn babies. Today there are a large number of means by which you can get rid of rats. Such preparations include various baits, ultrasonic whistles, and ditches. When exterminating rodents, care must be taken. Ill-considered actions can harm not only rats, but also the rabbits themselves.