Growing onions for a turnip in the open field
It is difficult to imagine our menu without onions; it is no coincidence that every gardener strives to plant this vegetable in his area. Growing onions for a turnip has its own specifics, and if you know all the agricultural techniques and properly care for the plants, the yields will always be high.
Growing and caring for onions: features
Many people are interested in how to grow onions per head? At the same time, everyone wants to get large beautiful turnip bulbs. This is possible if planting sets, as well as picking onions. By autumn, with proper care, large onions will grow from them.
You can get onions for a turnip from seeds (directly into the ground or through seedlings), but in this case, to get a large onion in one year, you need to select the appropriate varieties of onions. And so the traditional scheme is when nigella is sown in the first year, sevok is obtained, and then turnip is grown from it in the next season.
Growing onions per head can be done in different ways. Someone buys sevok, others prefer to grow their own - it all depends on the desire, opportunities and availability of time. In addition, it is not always possible to acquire the exact variety of onions that you want to grow yourself with sevkom. At the same time, the assortment of seeds presented in the store is very diverse, and you can choose the variety you like and sow nigella. But only then for breeding, you can grow your own seeds of your favorite variety.
How to grow good onion sets from nigella
To get your own high-quality sevka, you will have to start growing it from seeds. In the south, you can sow nigella directly into open ground, in the northern regions it is best to grow onions through seedlings.
ON A NOTE! The best germination rate is possessed by nigella no older than two years.
The seeds to be sown are calibrated, then placed in a potassium permanganate solution for disinfection (about 30 minutes). To obtain friendly and strong shoots, for growth, the seeds can be soaked in any stimulator. After which they are placed for a couple of days in a damp cloth for germination, then they are slightly dried and sown.

IMPORTANT! The listed procedures for the preparation of seed material are carried out both for seeds that will be sown in open ground and for sowing seedlings.
Sowing dates for nigella depend on the climate of the area, as well as the weather conditions of a particular year. But usually nigella is sown on the ridges around mid-to-late April, the main thing is that the soil is warmed up. Sowing dates are chosen for seedlings, based on the fact that seedlings, when planted in open ground, should be 60 days old and have 3-4 true leaves.
Grooves are made on the prepared ridges, then prepared seeds are sown in them or seedlings are planted. When sowing nigella, it is difficult to control the density of seedlings, therefore, after the emergence of sprouts, it will be necessary to thin out. If everything is done correctly, the seeds will sprout quickly.
- loosening;
- compulsory weeding;
- watering onions.
Onions are not watered often, about once every 7-8 days, being guided by the weather. For feeding, you can use mullein diluted in water (1:10) or complex fertilizers.

IMPORTANT! As soon as the formation of onion sets begins (in July), watering should be stopped. They also stop feeding the plants.
In the second half of summer (from late July to early September), the feather of the onion turns yellow, lays down, the neck of the onions becomes thin, and this is a signal that the onion can be removed. Carefully dig up the onions, shake off the ground and lay them out to dry, first on the ridge, and then under the canopy or in the attic.
After this stage of drying, the leaves are cut off, leaving a small neck, and the onions are dried for about 14 days at a higher temperature - up to + 30 ° C. Then they are kept at + 40 ° C for about 10-12 hours, and then sorted and harvested for winter storage ...
The best sowing for future sowing is from 1.5 to 2 cm in diameter. Smaller specimens can dry out over the winter, larger ones with juicy inner scales, although they are used for sowing (the so-called sampling), do not differ in yield.
Sevok is stored in boxes, baskets, boxes at temperatures from 10 to 24-25 o C.
IMPORTANT! Sevok is poured in boxes and boxes with a layer of no more than 6 cm, and no more than 3 kg are stored in baskets and bags with onions.

Usually, gardeners know how to grow onions for a turnip from a set, but not everyone succeeds in saving it without losses for subsequent planting. But adherence to simple recommendations will allow you to avoid spoilage of the seed and in the spring start planting on a turnip.
ON A NOTE! Small heads of seedlings can be planted on a turnip before winter, avoiding problems with its storage, and at the same time getting early production in the spring.
Growing turnip onions from seedlings in the open field
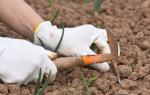
The most popular and affordable way for everyone to grow onions for a turnip is to grow it from a set. Planting and care in the open field does not require much trouble, the main thing is to follow the basic rules.
Cooking a place for onions
In the fall, the ridge where it is planned to plant the sevok is carefully dug up. If the soil is poor, then humus or compost (0.5 buckets per square meter), wood ash should be added. Onions do not like a lot of organic matter, so fertilization rates should be observed. Also, never apply fresh manure for planting onions.
The ridge should be in a sunny place where groundwater does not fit, there is no stagnation of moisture. The best soils are sandy loam and loamy; on acidic soils, dolomite flour or fluff lime is added.

Preparing onion sets for planting
In the spring, the sets are taken out of the bags and boxes, and they are sorted again. Large (more than 2.5 cm) seedlings are planted separately, it will be possible to take greens from these plants. For a turnip, a medium-sized set is intended.
The planting material is first warmed up for about 7 hours at a temperature of up to 40 ° C. Then the onions are soaked in a solution of potassium permanganate (for 20-30 minutes) or any growth stimulator (for about two hours).
When to plant onions on a head from a set? The timing depends on the terrain, climate, and weather conditions. But the soil should be warmed up to about 12-14ºC.
Planting onions in the spring on the head
How to plant onion sets? On the prepared ridge, rows are made (the distance between them is at least 30-40 cm), where the bulbs are carefully planted. The distance between them should be at least 6 cm, the depth depends on the size of the set. When planted above the surface, the tail of the bulb should be slightly visible.
Usually, the first shoots appear after 8-10 days, but here it all depends on the quality of the planting material, weather conditions.

How to water onions
This vegetable crop does not require a lot of water to grow. The plant needs moisture in the first half of the growing season, when the feather grows and the mass of the bulb grows.
How often in the garden to water the onions on the turnip? Usually, plants are watered no more than once a week (in hot weather), with the obligatory loosening of the soil.
One month before the expected date of harvesting, it is necessary to stop watering the onions. You also need to stop feeding. Only loosening remains, which prevents the appearance of a hard crust on the soil surface.
How to feed onions on the head
Experienced gardeners know from their own experience that if the soil on the ridges was well filled with fertilizers, then in the summer season the onions will not really need additional feeding. But if there is slow growth and a pale feather, then fertilizers are needed.
How to properly feed onions for a turnip?
The first feeding of onions on a turnip is carried out when the seed has already 3-4 true leaves. Use complex fertilizers (according to the instructions), as well as diluted mullein (1:10) or bird droppings (1:20). You can apply a special onion fertilizer (sold in stores) by foliar dressing.

The second time you need to feed it with wood ash or phosphorus-potassium fertilizers. Nitrogen is excluded, since during this period the plant grows a bulb and potassium and phosphorus will be more useful. The feeding regime should be tough, and you should not overfeed the plants.
IMPORTANT! The feathers of the sevka grown on the turnip are not cut off!
For greenery, samples are used, which is best planted on a hotel bed.
Weeding
Everyone knows that onions, like all vegetables, must be weeded. But, unfortunately, gardeners do not always have enough time for this. Meanwhile, weeds can not only cause poor onion growth and a decrease in its yield. They create increased moisture, which is detrimental to vegetables and very attractive to various pests and diseases. Also, a turnip that grows in weed beds will usually have a large and thick neck, and such bulbs are poorly stored in winter.
Weeds must be removed by hand, preferably after rain or watering when the soil is wet.

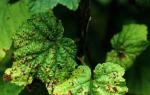
Pests and diseases of onion turnip
Many people ask how to grow large onions, get a good harvest and avoid the use of "chemicals" in the garden. For fertilization, it was said above, but what about diseases and pests?
The most important thing is to carry out prevention, as well as adherence to the rules of agricultural technology, and then you will not have to use toxic drugs.
Most often, turnip onions are affected by various types of rot, as well as downy mildew. What to do for prevention, how to prevent onion disease?
- It is necessary to plant sevok on prepared ridges, avoiding thickened plantings.
- You cannot grow onions for several years in a row in one place. Optimal - return to the previous place in about three to four years.
- When watering, you need to carefully water the plants, and then immediately loosen the soil.
- When growing onions, soil mulching is used, which allows you to retain moisture and prevent the appearance of weeds.
- It is imperative to remove diseased or weakened plants, as well as those where the feather turns yellow.
- It will stop diseases and adherence to the dose of fertilization (this is especially true for nitrogen, an excess amount of which negatively affects the condition of the bulbs).
Good results are obtained by processing the seedlings before planting with a solution of potassium permanganate, copper sulfate, and heating the bulbs. Also, on the ridges, you can spray the plants (when the leaves are about 14-15 cm) with copper chloride (a teaspoon in a bucket of water).

Plants that are grown to obtain feathers for greens cannot be subjected to such processing.
From pests - onion flies, thrips, onion moths, regular loosening, special mixtures help well:
- tobacco dust and lime (mixed in equal amounts and powdered onions);
- tobacco dust and black ground pepper;
- ash.
Also, planting onions can be saved with salt water, composition: 200 grams of ordinary table salt is diluted in a bucket of water. Water should be done carefully, not allowing water to fall on the onion feathers.
Why did the bow go to the arrow
In addition to leaves, onions can produce a peduncle, or, as they say, go into arrows. In the basket of the peduncle, seeds ripen - nigella.
But if onions are grown for a turnip, then arrows are completely unnecessary. They take up nutrients and prevent the formation of a full and strong bulb. What if the arrows are coming? If this is observed, then the peduncles must be cut off.

And in order to prevent shooting, you must follow a number of rules:
- when storing bulbs in winter, sudden changes in temperature should be avoided;
- use only high-quality seed material;
- warm up the sevok before planting it on the ridges (especially for purchased bulbs);
- do not plant large onions on the turnip - samples, since it is he who most often goes into the arrow;
- plant sevok, observing the terms and always in the heated soil;
- water the onions correctly, avoiding excessive moisture. With a bad summer, watering should be completed already a month before harvesting the onions.
If there is a peduncle, it is cut off or broken off at the base. After breaking out the arrow, the torn peduncle is thrown away. But we must continue to monitor these plants, as there may be repeated flower stalks. These arrows are also broken out or cut off, and then, when stored, these are the bulbs that are used for food in the first place.
How to speed up the ripening of onions
It so happens that gardeners want to speed up the ripening of onions. This is due to bad weather conditions, prolonged rains, and a drop in temperature.

What can be done and what acceleration measures can be taken?
- Trim the roots of the turnip at a depth of 5-6 cm from the bottom.
- For about 10-12 days, for accelerated ripening, you can slightly bare the bulbs, shaking off the earth from them. Also, in a month you need to finish watering the onions.
Many are interested in whether it is possible to completely cut off the leaves of a growing onion to accelerate ripening? No, this cannot be done, even if the feather is already turning yellow, since pruning will only lead to a deterioration in the quality of the bulbs and their decay.
Harvest
When to harvest onions? The timing depends on the variety, weather conditions, agricultural technology, but in general, onions are harvested from the ridges, from early August to early September. Readiness is determined by the following criteria:
- the feather turns yellow;
- mass lodging of leaves begins;
- the bulbs are fully formed in size and have the characteristic color of the outer scales for the particular cultivar. They can be, depending on the variety, yellow, red, white.
With lodging and yellowing of the feather, one should not be late in harvesting the turnip, since the onion can again give roots after 10-14 days. Then it will be unusable for storage.

As soon as the feather turns yellow, the turnip is removed from the ridges. They choose a dry and clear day for this, carefully digging out the bulbs and shaking off the earth from them. Then they are laid out directly on the ridges to dry, and after that they are removed under a canopy.
ON A NOTE! It is not recommended to immediately tear off or cut off the feather of the onion, do it later, when the leaves finally turn yellow, dry, and the neck will be thin. If you tear off the leaves earlier, the bulbs can get infected and they will rot.
The onions are dried under a canopy or in the attic for about two weeks, then the leaves are trimmed and put back to dry. The temperature should already be slightly higher - up to 30 ° C, the period should be about a week.
If storage in braids is supposed, then the leaves are not cut off at all. A properly grown, well-dried and ready-to-winter turnip will have one layer of new scales in about two weeks.
After thorough drying, the onions are placed in boxes, bags or baskets and stored at room temperature.
Now, having learned how to grow onions for a turnip, you will always have good yields of this useful crop.