Cheese caramel cake. Caramel cake layers. Preparing caramel mousse
- Hazelnut flour - 195 g
- Powdered sugar - 150 g
- Flour - 60 g
- Eggs – 270 g
- Proteins - 150 g
- Sugar - 50 g
- Hazelnuts – 70 g
Do you know what I came up with recently!? I want the blog to have cakes for every taste and for any event. Therefore, in the coming months you will witness how one cake will replace another, competing for your love and enthusiastic exclamations of guests. Let your head spin about what cake to choose for your boss’s birthday, and what to take to your daughter’s kindergarten for her first anniversary. Moreover, I will try to make sure that all the cakes are unique, which means more decors, assembly options, fillings, serving ideas, and so on, all this will be easily implementable in any kitchen with a minimum number of tools, I understand that Not everyone has time for complex techniques and purchasing professional tools.
I already have cakes that I will always be proud of - this one, which simply has no equal in its combination of tastes and textures; with its secret taste, unique decoration and perky marshmallow knots; super chocolate, amazing with the simplicity of the technique and ingredients and the resulting strength of chocolate per cubic centimeter; many people like it - a cake from Jamaica, relevant all year round, regardless of the season and weather outside! This time I thought the nuts and caramel were missing! Today we will be preparing Nut Madness - a new cake that will definitely become a classic and a source of pride for every housewife.
In short, this is an indecently large amount of nuts and caramel in various forms. In fact, the decor on top hints at this - the prickly nuts in caramel say: “The time for the holiday has come!” Inside are airy, elastic and very juicy nut cakes with pieces of nuts, moderately porous with a strong aroma of the nuts you decide to use. In the layer we have cream cheese and thick caramel, and if you are not good at caramel, I will tell you how to bypass the system!! On the outside we have the same cream cheese, but with caramel in the composition. Thanks to this technique, the cake is structurally amazingly stable, holds its shape well, but at the same time, every piece literally melts in your mouth. A cake that is very easy to prepare, a cake without compromises and failures, a cake for the most loyal nut lovers! Well, # Let's Cook #Nut Madness!
Let's start by making hazelnut sponge cake. This sponge cake is ideal for sponge and mousse cakes and pastries. Firstly, it has a good structure, it is dense and tender, bakes well without blistering, and, secondly, you can regulate its thickness yourself, in case you make cakes.
Let's start with the fact that the nut flour (you can) needs to be dried, even fried a little. Sometimes the flour is raw, and this will help us get rid of excess moisture, on the other hand, nuts give off more aroma and taste if they are well calcined. This is what we will do. To do this, I poured hazelnut flour (195 g, it is probably the most delicious) onto a baking sheet and baked at 140 degrees for 15 minutes, constantly opening the oven and stirring it. You can do the same in a frying pan with a thick bottom. You'll immediately know when to stop because of the good nutty aroma. In the photo you can see that the color will become redder.
Use this technique in any baked goods and get a nuttier aroma and taste in desserts. At the same time, you can warm up whole hazelnuts (70 g), which will also be useful to us.


While the nut flour is baking, prepare the meringue until it reaches soft peaks. To do this, beat the whites (150 g) with sugar (50 g) with a mixer. A manual one will do it faster if you beat it in a glass - think for yourself, the entire mass of the protein is whipped at the same time. This is better than a wide bowl where some of the protein will sit idle.


Add eggs (270 g). Beat with a mixer until smooth. Think about the sequence in which you use the mixer. First, I beat the whites with clean whisks (they are capricious about getting fat), and only then with these whisks (I didn’t even wash them) I beat the second part of the dough.

In total, we will get three parts of the future sponge cake: whipped whites, coarsely chopped hazelnuts (the same 70 g) and beaten two types of flour with eggs.

In two stages, add the meringue into the dough, mixing the mixture with a spatula.

Pour the resulting dough into three rings (or molds). The ideal diameter is 16 or 18 cm. The dough is so not capricious that I put the rings on a silicone mat and simply poured the dough into them. If the form is solid or detachable, of course, lay parchment on the bottom. No French shirts are needed here.
When you pour the dough into the molds, sprinkle in the chopped nuts and press them a little so that they slightly sink into the dough mass. Bake at 140 degrees, top-bottom mode. Until fully cooked, when the cake springs confidently when pressed with your finger. Baking time will vary for everyone, so bake only as long as needed.

Within 2-3 minutes the cakes will move away from the walls of the mold and need to be removed. You see, it’s easier to work with rings; you lift the ring, and the cake lies there and waits. Immediately wrap them in film and place them in the refrigerator when cooled. They can be used in 6-8 hours.
As you can see, there are no bumps at all. We will have no waste.

- Condensed milk var. — 200 g
- Gelatin Ewald – 6 g
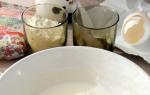
While we're waiting for the crust, you can start making the filling. Nuts go well with caramel. If you know how to make it yourself, prepare 200 grams of very thick. If not, buy good condensed milk and use that.

Soak leaf gelatin (6 g) in ice water. Place the condensed milk over medium heat and bring it to a light boil.

Something like this.

Add squeezed gelatin.

Be sure to punch the mixture with a blender.

Pour into any spacious container. The wider, the faster the mass will cool down and stabilization will begin.

You can speed up the process if you place the container next to an open window.

When the mass has completely cooled and hardened, collect it with a spoon or spatula into a glass.

Blend until smooth with a blender when you are ready to work with the cake. This is important because we have gelatin in our composition. Firstly, we will warm up the mass with a blender and melt it a little, and secondly, it will be more convenient to work with the mass. Then it will form a tight lump and it will become more difficult to work.


Place the caramel mixture into the bag. And also prepare any cream that you like. I'll give my proportions later. After ripening, the cakes are ready for use. Cut off a little of the top to open the pores.


Assemble the cakes in the basic coating, put them in the refrigerator for at least half an hour. You can cut the waiting time in half by putting the product in the freezer.

At this time, add the remaining caramel to the cream. It will be thick and quite difficult to plant. Try.

Then, at maximum mixer speed, beat the cream for 5-10 minutes until the caramel is completely dispersed and there should be no lumps left.

Transfer the cream into a bag and prepare 60-80 grams of dark chocolate for decoration. I melted the chocolate in boiling water.

Assemble the cake completely, covering it with a final layer of cream. Drizzle melted chocolate on top. For decoration, I used chopped hazelnuts (I immediately added 30 grams to the decoration and dried it with the nuts that went into the cakes). I also made caramelized nuts.

Next, dip each nut in the caramel and let it drip down nicely, placing the nut vertically. Use a piece of foam. The nuts should hang upside down. The whole secret is in the temperature of the caramel (thickness). At one point it will drain too quickly, then dip the nut again. At some point you will see that the caramel becomes viscous and flows down in a long tail. It can be trimmed with scissors. That is, at the right temperature, one layer of caramel is enough and the tip will harden very quickly. Once the caramel hardens, the nuts can be stored in a dry place for a very long time.

Each nut will have a tail of a certain length, so place the longer ones in the center and the shorter ones towards the edges, then the cake will have a rounded shape on top. I also decorated the side of the cake with hazelnut halves to enhance the effect.

Inside everything is as we planned, a little cream and a stable layer of caramel. It does not flow, does not melt and behaves extremely predictably.

Note to the hostess
Let's look at some points.
Airy dough.
We don't have soda, we don't have baking powder. All the pores, all the airiness and fluffiness of the dough are supported by the whites whipped with sugar. And here you need to be as careful as possible. Do not overbeat the whites with a mixer, add the meringue in two stages and only with a spatula. Try to make as few movements as possible, this way you will protect yourself from a situation where the protein has collapsed and the dough has become liquid and sticky. In addition, immediately send all the pieces into the oven; the dough does not tolerate downtime. And, of course, you can’t bake all the dough in one form, I know there are those who like to feed homemade breadcrumbs, don’t be like that!
Nut flour.
They will probably never stop asking about the possibility of replacing nut flour with regular flour. But the only ingredient these two types have in common is the word “flour.” Therefore, no, it is impossible to replace. However, today it is not so difficult to buy 200 grams of nut flour, much less prepare it yourself. There are many ways, all suit us, because there are no requirements for the quality of flour.
For baking, I always use hazelnuts, they are the most aromatic, especially after heating. Although, any nut flour and even a blend is suitable, and why not!? If it comes with husks, even better, the cut will be more interesting in color.
You can buy flour in my store.
Regular flour.
I added it along with the other dry ingredients and stirred. The cakes turned out beautiful, durable and versatile. There may be a situation when you need a more delicate, soft, loose texture. In this case, add regular flour later. That is, beat eggs with powder and nut flour. Then they added the flour with a spatula, then they added the meringue. It’s simple, knead the flour into the wet mass less, less gluten develops, which means the dough will be more tender.
Why did I add nuts not to the dough, which is more logical, but to the molds. It's simple, we don't have baking powder. All the airiness comes from the whipped egg whites. There is a risk of overbeating it, then it will separate. Therefore, in order to do less unnecessary mixing with a spatula, I added nuts to the finished dough, thereby retaining more airiness.
Use the idea from Carrot Cake and caramelize the nuts to add even more crunch to the cake!
Meringue.
I wrote how to beat egg whites correctly in the material ““. Let me just say that we need soft peaks and we need to try hard here. Because if you do something wrong, the cakes will not turn out 100%. The good news is that we beat the whites separately and, in case of failure, we can try again without ruining the entire dough.
Of course, it is better to do everything in grams as I wrote. But I'm sure there will be a temptation to save money. Therefore, here is a reasonable alternative: we make meringue from 4 whites, and the egg mixture will consist of 4 yolks and 4 whole eggs. We are talking about eggs of category C-1, approximately 55 grams without shell. In total, you will need 8 eggs, there will be no leftovers.
Caramel.
If you decide to cook it yourself, and you also need it for nuts, there’s nothing complicated about it. I understand that it is impossible to describe all the nuances, and it still won’t help. There are a couple of recipes on the blog that I recommend reading. It’s not the grams that are important, but the cooking techniques and details. Start with the recipe " ", then you can read about " ".
Remember that any cakes can be greased with exactly the cream that you like. It's up to you to decide its density, tastes, etc. I really like ““, so I used it. For this cake I needed: powdered sugar (170 g), butter (170 g, soft, 82.5%) and cheese (480-510 g). A quarter was used for the base coating, the rest I added caramel and whipped the cream again until it had a smooth texture.
Chocolate glaze.
I drizzled melted dark chocolate over the cake. Firstly, the color will be contrasting, and secondly, its bitterness will help balance the sweetness of the nuts and caramel filling. You need to apply the chocolate in a thin layer, otherwise it will become a hard shell on the cake and will be difficult to cut. If you are afraid, prepare the ganache by combining dark chocolate (70 g) and heavy cream (30 g, 33%). read it for yourself.
- “Prickly” nuts.
The decor is stunning, spectacular and stylish. One problem, caramel melts if it is in a humid environment. The ideal plan is to decorate the cake with nuts before serving. If it doesn't work out that way, be sure to cover it with a lid before putting it in the refrigerator. It will be great if you keep the cake in the vegetable compartment, where the humidity is slightly lower. I stored the nuts separately on a shelf near the window; sunlight dries the caramel well.
Other filling.
You don't have to use caramel at all. Sour berries go great with nuts. In this case, you should freeze a couple of filling pieces that are smaller in diameter than your molds. Let’s say for 16 cm cakes, the filling needs to be poured into 14 cm molds. The proportions can be left the same: berry puree (200 g), Ewald gelatin (6 g). The ““ section will help you figure out how to work with fillings. The process in the cake ““ is described quite clearly.
I'm sure you'll enjoy using ganache in the filling. Take milk or dark chocolate, find your proportion and then proceed in the same way - a frame of cream and ganache in the center. Experienced confectioners make a layer only of ganache. We will talk about this in one of the following cakes.
Gelatin.
Immediately soak the gelatin in ice water. Leaf in any quantity, powder in a ratio of 1:6, the same number of grams. Gelatin has its own strength, which is why I give my brand - Ewald, there is also Parfait (sheet), its strength is about the same.
There is special material for those who are learning to assemble cakes. Therefore, I will give a link to the material ““. That material is quite old, so if there are any discrepancies, consider the text of this recipe to be more current)
Dough portions.
The dough consumption table is as follows (3 cakes, height from 3 to 5 cm):
| mold diameter (cm) | 16-18 | 20-22 | 24+ |
| portions of dough | 1 | 2 | 3 |
Step 1: prepare the cake dough.
First, preheat the oven. up to 175 - 180 degrees Celsius. Sift the required amount of wheat flour into a deep bowl through a fine sieve, add baking powder, soda, salt and mix the dry ingredients until smooth with a tablespoon. Place the required amount of soft butter and sugar in a clean deep bowl. Beat the ingredients with a mixer until smooth, turning on the device at medium speed. After 10 minutes of intensive beating, add liquid vanilla extract and shelled chicken eggs to the sweet butter. Beat ingredients at medium speed 5 – 6 minutes.
 And then add the required amount of buttermilk, that is, low-fat cream, into the total mass. Re-beat the ingredients at very low speed, giving this process 7 – 8 minutes.
 Now take a bowl with the mixed dry ingredients and add the dry mixture into the liquid mixture in parts, while mixing all the ingredients of the dough at a very low speed using a mixer.
  When it becomes difficult for the electric appliance to mix the dough, remove the mixer blades from the bowl, clear them of any pieces of flour mixture and knead the dough with a wooden kitchen spatula until smooth. The finished dough should be of medium thickness, similar to very thick cream.
 Step 2: bake the crust.
 Now decide what shape you want the cake to be. This recipe uses an aluminum non-stick baking dish 23 by 31 centimeters. Line the pan with baking paper and spread an even, thin layer of butter. Then, using a tablespoon, pour the batter into the mold, shake it a couple of times to release air bubbles and place in a preheated oven.
  Bake the crust for 35 – 40 minutes. At the end of the required time, check the readiness of the dough with a wooden skewer. Just insert its tip into the flesh of the flour product and pull it out; if there is liquid dough at the end of the skewer, put the pan back in the oven and let the cake finish until fully cooked. Well, if you followed the instructions of this recipe and did not add unnecessary ingredients, your cake will be completely ready in 35 - 40 minutes. Remove the pan from the oven, let the cake cool and then very carefully, holding the edges of the baking paper, remove your work of art from the pan. Place the cake on an iron wire rack until it cools completely, this will take at least 1 hour. After your cake has cooled, turn it upside down, very carefully, using a sharp knife, cut off the fried crust and start preparing the caramel.
 Step 3: prepare caramel.
 Pour the required amount of sugar into a deep saucepan.
  Pour in clean distilled water and place the container on the stove, turned on to medium level.
  Bring the mixture to a boil and the sugar is completely dissolved, stirring with a whisk.
  Boil the liquid mixture until it becomes thick with a pronounced caramel aroma.
  Do not burn the sugar; this process should take you no more than 10 minutes. Your caramel at this stage should be a dark amber color with a golden hue.
  Through 10 minutes insert a candy thermometer into the fragrant mixture when its needle rises up to 350 degrees Pour the cream into the saucepan and add corn syrup. While adding these ingredients, constantly stir the liquid mass with a whisk.
  Continuing to vigorously whisk the caramel, cook it some more. 10 – 12 minutes, the mixture will boil like crazy, but don’t worry, that’s how it should be, the main thing is don’t stop whisking it.
  Now the final touch, add liquid vanilla extract to the caramel, continuing to whisk the liquid, boil it some more 3 – 4 minutes, let the vanilla dissolve its aroma, then remove the saucepan from the stove.
  Let the caramel brew 3 – 4 minutes, no more, otherwise it will thicken and you will not be able to pour it onto the cake.
 Step 4: Bring the caramel cake until fully cooked.
 Place a tray under the rack on which the sweet cake layer is placed. Then pour hot glaze onto the surface of the cake, spreading it evenly over the entire surface using a knife.
  Let the glaze drip from the cake in random, chaotic drips, it will look simply magical.
  Then leave your cake like this for 30 minutes, During this time, the glaze will become richer, thicker, and its surface will be smooth and slightly shiny. While the glaze is cooling, it's time to brew fresh tea. Just before serving, place the cake on a tray.
  If you have any extra glaze, place it in a clean, dry jar, close the lid tightly and put it in the refrigerator. This magnificent sweet mass goes well not only with cake, but also with fresh bread, donuts and buns.
 Step 5: Serve the caramel cake.
 Caramel cake is served at room temperature. After preparing the cake, let it sit and lightly soak in the glaze. How to decorate this breathtakingly delicious dessert depends only on your desire and imagination. Whipped cream, thick sour cream whipped with sugar, chocolate syrup or scoops of ice cream are ideal additions to this cake. It is best to savor this yummy with fresh tea, a cup of coffee, liquid yogurt, fresh milk or fruit juices. This delicate dessert will bring you a lot of pleasure, cook and enjoy! Bon appetit!
 - – Instead of liquid vanilla extract, you can use either 10 grams of regular vanillin or 30 grams of vanilla sugar.
- – To make caramel, be sure to purchase heavy cream, otherwise it may not thicken. If, nevertheless, your caramel seems too liquid, rehabilitate it by adding sugar and re-boiling for 10 minutes.
- – You can cut the cake lengthwise into 2 parts and layer it with caramel twice, which will significantly soften the finished dough and make your culinary masterpiece even softer, richer, sweeter and of course tastier.
- – When making caramel, you can use dark brown sugar instead of regular sugar, it will give your caramel a darker, richer color and a denser consistency.
Many people love such a delicacy as caramel cake. Making it is not the easiest task. The dessert takes about three hours to prepare from start to finish, but it's well worth the effort. What do you need to make this cake?
Classic recipe
For the classic recipe, the following ingredients are needed:
- 1 cup unsalted butter, warmed or softened,
- 1/3 cup vegetable oil,
- granulated sugar 2 1/2 cups,
- 3 cups sifted flour,
- 6 large eggs plus 2 yolks,
- 1 teaspoon baking powder,
- 1/2 spoon of tea salt,
- a glass of sour cream, slightly warmed,
- 2 tablespoons vanilla extract.
For caramel cream:
- 300 grams of butter,
- 2 cans of condensed milk,
- 2 cups granulated sugar,
- 2 teaspoons vanilla extract.
Caramel cake: recipe
Preheat the oven to 180 degrees. In a deep bowl, mix the butter, oil and sugar with a mixer at high speed until the ingredients form a light and fluffy mixture. This will take approximately 5-6 minutes. Then turn the mixer to medium speed and add the eggs and egg yolks one at a time until everything is well combined. Add vanilla extract to the dough and stir. Sift the flour into a separate container, add baking powder and salt. Turn on the mixer and at low speed, gradually add the flour mixture to the dough, while adding sour cream, whisking constantly. You should get a completely homogeneous mass.

Take three baking pans of the same size and grease the insides with oil. Pour into the dough evenly, in the same quantity. Bake in a preheated oven for 23-30 minutes. Remove the cakes from the oven and leave to cool for 10 minutes. Then remove them from the molds and wait for them to reach room temperature.
Preparing the cream
While the cakes are cooling, you need to do this: melt the butter, condensed milk and sugar over medium heat in a small saucepan. Heat until all ingredients are melted and combined. Continue heating, stirring occasionally, for 1.5-2 hours (check constantly to make sure the mixture does not start to burn). You need to wait until the cream thickens and becomes an attractive golden color.

To make sure the caramel is ready, dip a tablespoon into it. If the mass does not flow down, but envelops the surface, the cream can be used. Remove the pan from the heat and add to the mixture. Leave to cool for approximately 15-20 minutes before spreading onto the caramel cake.
After this, coat the cakes and arrange them in a stack. Cover the finished dessert with a layer of the remaining caramel.
Option with chocolate
The above recipe is a classic, but far from the only one. It can also be prepared with an original salty flavor.
For it you will need the following ingredients:
- 115 grams of salted butter,
- 225 grams of dark chocolate (containing 70% cocoa),
- 150 ml milk,
- 225 grams of brown cane sugar,
- 2 eggs (large),
- 150 ml sour cream,
- 225 grams of flour with the addition of dry yeast,
- 1 teaspoon baking powder.
For caramel:
- 450 grams of powdered sugar,
- 125 ml cream,
- 2 tablespoons syrup,
- 115 grams of salted butter,
- 2 tablespoons sour cream,
- 2 teaspoons sea salt.
For the chocolate ganache:
- 225 grams pure chocolate (70-80% cocoa solids),
- 250 ml heavy cream,
- a pinch of coarse sea salt for decoration,
- chocolate truffles for decoration.

Like sea salt?
First, you need to make caramel. Pour 100ml water into a large saucepan. Add the sugar and heat gently until the grains have melted, then turn up the heat and cook until the caramel is a deep golden brown. Lift the pan from the heat occasionally to prevent sticking, but do not agitate. Turn off the heat and thoroughly beat the resulting caramel with butter, cream and sour cream until fluffy. Add sea salt. Whisk until smooth and then leave to cool. This caramel cream cake recipe is time-consuming to make and can be made ahead of time. It can be stored in the refrigerator for one to three days. To use it later, you need to wait until it warms up to room temperature.
Then you need to make the cakes. Preheat the oven to 180 C. Grease a baking sheet with oil and place parchment paper on it.

Melt the chocolate, butter and milk in a large saucepan over low heat, stirring until smooth. Remove from heat and then whisk in sugar and vanilla. Cool to room temperature. Whisk the egg yolks with the sour cream and then fold into the chocolate mixture. Add flour and baking powder there.
Beat the egg whites in a separate bowl until thick. Mix a third of the whites into the prepared dough, then gradually pour in the remaining ones. Place the prepared mixture on the prepared baking sheet and bake for 40-50 minutes. Leave to cool for 20 minutes, then remove from the pan and set aside.
To make the ganache, melt the chocolate in the cream over low heat, then leave to cool.
To assemble the caramel cake, cut the finished cake in half horizontally. Coat it with the prepared cream in the middle. Spread a layer of chocolate ganache over the top of the cake and sprinkle with sea salt crystals. You can place chocolate truffles on top if you like this arrangement.
Option with bananas
You can prepare this delicacy with the addition of bananas. Since these fruits have a very soft consistency, this cake turns out to be similar to pudding. It is for this reason that it is recommended to divide the dough into 3 parts and bake 3 cakes. In this case, the dessert will retain its shape.
This dessert can be served without decoration. If desired, only caramel applied in a thin layer can be used. How to cook it?

For the glaze:
- 2 cups heavy cream,
- water 1/2 cup,
- a quarter cup of butter,
- 1/2 spoon of tea salt,
- sugar 1 1/2 cups.
How to make caramel glaze
Heat the cream in a small saucepan over low heat. Don't let them boil.
Mix sugar and water together in a large, heavy-bottomed container and heat over high heat. Stir until the sugar dissolves, then allow the syrup to boil and cook until it reaches a distinct amber color. This will take 8-15 minutes, and the time depends on the pan and stove. As soon as you see pale yellow streaks on the surface of the mixture that begin to darken from the center, immediately turn off the heat. The main thing is not to let the mixture burn.
Immediately pour the hot cream into the syrup. Use a large spoon to stir the mixture well. Be very careful - the caramel has very hot fumes and may splatter! Add butter and salt to the mixture and beat well. Return the pan to the stove and simmer over low heat for 5 minutes.

Let the caramel cool, then pour it into a jar and store it in the refrigerator. This frosting can be kept in the refrigerator for two weeks.
For the test you need:
- 3/4 cup unsalted butter, softened indoors
- 3 large eggs,
- 3/4 cup each white and brown sugar,
- 3 cups flour,
- 1.5 spoons of baking soda,
- milk 1.5 cups,
- 1/2 spoon of tea salt,
- 2 teaspoons vanilla extract,
- 1.5 cups mashed bananas, approximately 4-5 regular size bananas,
- 1.5 cups caramel frosting (according to the recipe above).
How to make banana caramel cake?
Preheat the oven to 200 degrees. Grease the inside of three equal-sized baking pans.
Beat the butter with both types of sugar with a mixer until fluffy. Gradually add the eggs and beat further until the mixture is fluffy.
In a separate container, mix flour with salt and soda. Whisk the milk, vanilla extract and mashed bananas in a separate bowl and add to the egg and butter mixture. Continue whisking while slowly adding flour.
Divide the dough into greased pans. Pour 1/2 cup caramel frosting into each and stir with the tip of a knife. Bake for 40 minutes. Be sure to cool the cakes before removing them from the pans.
For caramel cream:
- 1/2 cup unsalted butter,
- 1 teaspoon vanilla extract,
- 1.5 cups powdered sugar,
- 1/2 cup caramel frosting (recipe above)
- 1/4 spoon of tea salt.
Using a mixer, beat butter with caramel frosting, vanilla extract and salt until smooth. Slowly add powdered sugar and beat for another 3-5 minutes.
How to assemble a cake
Wait for the cakes to cool completely. Place the bottom layer of the cake on a plate and spread a thin layer of cream. Repeat with the remaining two cakes and spread the remaining cream on top. Drizzle the remaining glaze over the finished caramel cake and decorate with banana slices.
It is known that perfectly selected flavor combinations decide everything! Popular combinations such as banana and chocolate, strawberries and whipped cream, hot dessert with cold ice cream and others have already become classics. I suggest you try another interesting combination of chocolate and caramel in a cake.
Moist, soft chocolate cakes with caramel-chocolate buttercream that tastes smooth, silky and doesn't taste like butter, as buttercreams usually do. Caramel-butter cream fits perfectly with these velvet cakes, as if camouflaged in them, becoming delicate and noble in taste.
Ingredients for a 16 cm pan:
For the cakes:
- Strong coffee - 125 ml;
- Cocoa powder - 45 g;
- Flour - 165 g;
- Sour cream 18-22% - 70 ml;
- Butter at room temperature - 140 g;
- Sugar - 270 g;
- Egg - 2 pcs;
- Baking powder - 1 tsp;
- Soda - 1/2 tsp;
- Salt - 1/4 tsp.
For the caramel sauce:
- Sugar - 110 g
- Water – 30 ml
- Cream 33% – 125 ml
- Salt - a pinch
For caramel-chocolate cream:
- Room temperature butter - 225 g
- Dark chocolate – 225 g
- Caramel sauce
How to make caramel chocolate cake:
Preparing the cakes
Mix strong coffee with cocoa powder and sour cream in a bowl. Let cool slightly. In another large bowl, sift together flour, baking powder, baking soda and salt. In the bowl of a stand mixer, beat the butter for about 5 minutes until it is white and fluffy. Add sugar and beat for another 5 minutes.
Add eggs one at a time, beating each time until completely dissolved. Add the flour mixture in two stages, alternating with the cooled cocoa mixture.
Divide the dough into 3 parts. Grease the mold with butter and sprinkle with flour. Bake each cake for about 20-25 minutes. Check with a toothpick, which should come out clean from the center.
Leave to cool completely.
Making caramel sauce
Place sugar and water in a saucepan and place over medium heat. Dissolve all the sugar and bring to a boil and keep on fire until the mixture turns a rich amber color. Pour in the warm cream and stir for about 1 minute. Remove from heat.
Preparing caramel-chocolate cream
Chop the chocolate into a bowl and pour over the warm caramel sauce. Let cool at room temperature. Add butter in parts, beating with a mixer until silky and smooth.
Assembly
Divide the cream into 4 parts. Place the cakes on top of each other, spreading 1/4 of the cream on each cake. Spread the rest of the cream on the sides. Place the cake in the refrigerator overnight.
Do you hate baking because you're bad at it, or because your oven constantly lets you down? Don’t worry, right now in my kitchen I’ll tell you the secret of a great no-bake caramel cake. By the way, nowadays, no-bake pies have become especially popular, because preparing such desserts requires much less time and effort. Yes, any housewife can handle such a cake, even if you practically don’t know how to cook. Don't believe me? Then cook with us!
Ingredients:
For the crust:
- dry cookies - 200 grams;
- butter - 30 grams;
- coffee - 1 teaspoon.
For cream:
- milk - 500 milliliters;
- eggs - 2 pieces;
- starch - 2 tablespoons;
- gelatin - 20 grams;
- boiled condensed milk - 400 grams;
- vanilla - 10 grams;
- coffee - 1 teaspoon;
- cottage cheese - 180 grams.
For caramel filling:
- peanuts - 100 grams;
- milk - 100 milliliters;
- milk - 3 tablespoons;
- gelatin - 1 teaspoon;
- flour - 1 teaspoon;
- butter - 30 grams;
- sugar - a teaspoon.
Gorgeous no-bake caramel cake. Step by step recipe
Let's start by preparing the crust. For this we need any dry cookies. I used Maria cookies.
- In a food processor, grind the cookies into fine crumbs. If you don't have a food processor, you can put the cookies in a bag and crush them with a rolling pin (or a mortar in a bowl).
- Melt the butter in a water bath. Pour into the crumbs and mix.
- Now you need to brew half a cup of coffee so that it is strong. Sugar can be added to taste, or you can leave it out. When the coffee has cooled, pour it into the crumbs. Coffee can be replaced with any juice you wish.
- You should get a plasticine mass from which it is easy to sculpt.
- Prepare a plate on which to serve the cake. We put a form on it. Grease the edges of the mold with butter and begin to form a cake base without cookie sides.
- We put the finished cake in the refrigerator, but for now let’s get to the base.
- Pour gelatin into a bowl and pour in coffee. Stir and leave to swell and dissolve for 40 minutes.
- In a separate saucepan, beat the eggs, add starch, corn or potato. Let me remind you that starch can be replaced with flour. Add a bag of vanilla there. Gradually pour in the milk, stirring constantly.
- First set the heat to above medium, and then reduce it to low. Boil, stirring, until thickened. Transfer to a cold bowl.
- Now it’s time to add boiled condensed milk: add a tablespoon at a time and beat with a mixer.
- Add cottage cheese. It is better to use paste-like cottage cheese without grains. If you use regular cottage cheese, it is better to first rub it through a sieve. Then beat with a mixer.
- We transfer the gelatin that we left into a saucepan: it needs to be heated so that it dissolves better, but does not boil. Next, pour the gelatin into the cream and mix until smooth.
- Pour the mixture onto our crust and put it in the refrigerator again: for about 1 hour.
- We take gelatin again and dissolve it in milk: in the same way as in coffee.
- Now we need a frying pan with a thick bottom. Pour flour into the pan. Place on the stove and fry a little until caramel color. When the flour changes color, add butter and sugar.
- First the sugar will start to melt and then turn brownish. Mix vigorously so that there are no lumps. It turns out like this caramel. The most important thing here is not to overexpose the sugar, otherwise it will become bitter and tasteless.
- Add the milk little by little, remembering to stir constantly. Remove from heat. Pour into a cold container to cool the caramel faster. Add the swollen gelatin and stir thoroughly.
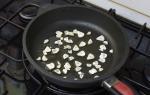
- Add roasted peanuts to the caramel.
- We take the dough out of the refrigerator, pour caramel and peanuts over our cake. It is important that the caramel is not hot.
- Place the cake in the refrigerator to steep for three hours (or overnight). During this time, the magnificent caramel cake without baking will harden well.
- Remove from the mold and cut into the required number of pieces. You can get creative and add chocolate, fruits and berries.
In the end, we got just a real restaurant dessert: a very delicate cream inside and bright caramel with nuts on top. Delicious! I think my recipe will come in handy on hot summer days, when you don’t really want to stand at the stove, but you always want something sweet. What could be simpler? As always, you can find step-by-step recipes for any dish on our “Very Tasty” website. Bon appetit!