How to install an interior compartment door. Installation of sliding doors Installation of sliding doors in a room
It is not easy to install compartment doors with your own hands - such a task can easily be classified as of increased complexity. However, “difficult” does not at all mean “impossible” if you have a good understanding of the design, the operation of its mechanisms, and if you carry out the installation slowly, carefully measuring the necessary parameters and carrying out all the required operations sequentially.
It is clear that you need to have all the necessary tools at hand and have good stable skills in working with them. If all these conditions do not seem prohibitive, then you can take on the independent production and installation of a sliding door.
When choosing this or that design of such a door, the homeowner simply must first know about its advantages and disadvantages.
Pros and cons of sliding door structures
Sliding doors in an apartment or house, especially in rooms with small areas, have many advantages:

- This saves space and allows you to use it for another purpose.
- This design visually increases the size of the wall.
- The absence of thresholds can also be considered an advantage - this can be very important if there are small children, elderly people or people with disabilities in the house - suffering from dysfunctions of the musculoskeletal system.
- It becomes possible to divide one room into two zones - this is important for a one-room apartment, when the room serves several purposes at once.
- When assembled correctly, such doors are very simple and easy to use.
- Sliding doors can add individuality to the meager layout of a typical apartment and influence the aesthetic transformation of the interior.
This design also has its disadvantages, which are also important to know:
- Since when closing the sliding doors there will be gaps between the door leaf and the frame in the doorway, the room will not be completely soundproofed.
- If the door is installed in the kitchen, it will not be able to fully retain odors in this room.
- The installation of such a door must be carefully adjusted, otherwise misalignment may occur. The sash may jam and it will not open or close;
- If you choose a door consisting of two leaves, then its installation will be much more difficult, since the halves must be perfectly matched to each other;
- Even the simplest sliding sliding door has a fairly high cost.
Types of sliding doors
As everyone knows, sliding doors differ from traditional ones in that their leaves do not swing open on hinges, but run along the wall along special guides. Such structures are divided into three subtypes - suspended, suspended cassette and doors with top and bottom guides. Let's take a closer look at them to figure out where and when which door will be optimal:
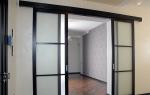
Hanging sliding doors
Hanging doors are the most popular option as they are the easiest to assemble and do not require dismantling part of the wall.

Such doors are suspended on a special structure, which is fixed to the ceiling or walls. The door leaf runs along a guide rail. Fastening and guide elements can be open or they can be decorated with a camouflage box.
The door leaf in this design is suspended at a distance of several centimeters from the wall and from the floor. Therefore, on the side on which the canvas is located, it will be impossible to place any piece of furniture close to the wall.

To ensure that the box masking the suspension structure does not spoil the interior of the room, you need to immediately think about its design and location. With such a casing you can cover only the rail on which the door leaf will run, or you can secure it from wall to wall. The second option will be especially preferable if the structure will be installed under the ceiling. Another option would be to install a box around the entire perimeter of the room. In this case, it can also serve as a disguise for a window cornice with curtains. Naturally, such fastening will be appropriate only when the height of the window and door openings is at the same level.
The second version of the hanging door is almost no different from the first in design. The only difference is that the guide rail is not attached to the wall or ceiling, but directly to the doorway.
Hanging cassette sliding doors
This type differs from hanging doors in that the system with guides is hidden in the thickness of the wall. Accordingly, the door leaf will go into the wall, into a kind of cassette arranged according to the size of the door.

Installation of this structure can be done in various ways:
- When building a house - directly during construction.
- When constructing a lightweight partition made of metal profiles and plasterboard.
- By hollowing out a niche of the required size and depth in the wall, and after installing the door designs - closures its plasterboard sheets.
- Installing an ordinary hanging door, and then covering both it and the entire wall with a plasterboard “screen”. In this case, you will have to sacrifice the area of the room, since the built wall and the gap left for the door will steal about 150 mm from the total area.
 The doors of such a door are “hidden” in the thickness of the wall
 A similar type of sliding design with the right type will cost much more than conventional hanging doors, since the installation is almost the same as building a new wall.
However, we must pay tribute to the fact that the aesthetics and comfort of this type of door are “several times” higher than all other designs. If installation is carried out correctly, its service life is practically unlimited.
 These doors are the most comfortable of all.
 You can place any piece of furniture close to the wall in which the door is hidden, since it will absolutely not interfere with the movement of the door. The design of the door and its frame can be made in different styles and from different materials, so there is always the opportunity to choose an option that suits the overall interior.
Doors with top and bottom track
In this version, the compartment door leaf is not suspended, but runs on a rail mounted in the floor.
This design is more difficult to install, since the upper and lower mounts will have to be perfectly adjusted. But it is much more reliable and stable than systems suspended only from above. The door leaf moves along the rails using rollers, which in this case are fixed both above and below.

The disadvantages of doors that have a lower guide rail include the fact that the profile will have to be mounted into the floor, creating a special long and narrow groove for it. In addition, there is another “Achilles heel” - dust, dirt, and small debris can collect in the recess of the guide profile - they can slow down and inhibit the free movement of the door leaf. Therefore, when installing such a structure, it will be necessary to carefully monitor the ideal cleanliness of the runners.
Despite on The reliability of this option, it is still more often used not for sliding doors, but in cabinets of the same name.
Whatever sliding door system is chosen, it can have one door leaf, two or even more. The choice based on this criterion will depend on the width of the opening into which the door will be installed, and on the wishes of the home owner.
Prices for compartment doors
Coupe doors
Materials and tools for installing sliding doors
Tools

To manufacture and install such a door structure, you will need tools that will help you carry out the work quickly and accurately. So, you should have the following at hand:
- An electric jigsaw and a circular saw are necessary for sawing bars and metal guides.
- A set of hand carpentry tools - hammer (mallet), screwdrivers, chisels, plane, etc.
- A screwdriver will be needed to carefully screw in self-tapping screws and other fasteners. when attaching accessories.
- Electric drill with a set of light RL for working with wood and for making holes for fitting screws in profiles.
- Plumb and building level, tape measure, pencil, square.
- To bring finished wood structures to perfect evenness, an orbital or eccentric sander can be useful.
Materials and spare parts
To assemble the door you need:
- One or two door panels. When purchasing them, you need to find out their weight, since you will also need to select hardware fastenings based on this parameter. The door leaf is selected depending on the chosen design. Typical door leaf dimensions in relation to the opening will be given in the table below:
— if a hinged structure is chosen, then the leaf should be higher than the door opening;
— if a cassette sliding door is installed, then the door leaf should be below the opening;
— when installing a door on two rails, the door leaf should be larger than the opening in the open version and equally smaller if it is made in the cassette version, i.e. go into the wall.

- One metal rail (guide) if the door is suspended and two - lower and upper, if the rollers on the door leaf are fixed on both sides. The rails must have a length equal to twice the width of the canvas. If there are two canvases, then the guide should be four times larger than their width.
- A beam measuring 50 × 50 mm and a length equal to the prepared rail.
- Rollers and fasteners for them, selected for the thickness and weight of the door.

- Two platbands, one of which will be installed on the side, and the second will cover the upper hinged structure, or a camouflage box will be installed instead. The platbands can be mounted on the sides in such a way that the canvas will fit into one of them when opening and closing.
- One or two closers that will bring the door to the desired location on the rail.
- Door handle - one or two.
- Anchors for installing timber on the wall.
- Decorative nails can be used to attach the trim.
| Name | Miniature |
|---|---|
| Self-tapping screw with press washer for hanging plate 4 × 40 |  |
| Self-tapping screw for fixing floor guide profile 4 × 15 |  |
| Self-tapping screw for fastening profile 4 × 60 |  |
| Self-tapping screw for fastening the lower guide profile 3 × 30 |  |
| Door handle |  |
| Rubber compressor |  |
| Open-end wrench No. 13 and hex key No. 5 |  |
 |
|
| Anchors |  |
| Floor guide profile |  |
| Roller suspension |  |
 |
Since hanging doors are the most popular for installation, the dimensions are given specifically for this design, although they may be suitable for a system with two rails.
Correspondence table for openings and leafs of a hanging sliding door with one leaf:
| Length of embedded beam in mm | |||||
|---|---|---|---|---|---|
| No frame | With frame | ||||
| 600×2000 | 540×1975 | 565×1975 | 704×2042 | 2047 | 1300 |
| 700×2000 | 640×1975 | 665×1975 | 804×2042 | 2047 | 1500 |
| 800×2000 | 740×1975 | 765×1975 | 904×2042 | 2047 | 1700 |
| 900×2000 | 840×1975 | 865×1975 | 1004×2042 | 2047 | 1900 |
| 600×2100 | 540×2075 | 565×2075 | 704×2142 | 2147 | 1300 |
| 700×2100 | 640×2075 | 665×2075 | 804×2142 | 2147 | 1500 |
| 800×2100 | 740×2075 | 765×2075 | 904×2142 | 2147 | 1700 |
| 900×2100 | 840×2075 | 865×2075 | 1004×2142 | 2147 | 1900 |
| 600×2200 | 540×2175 | 565×2175 | 704×2242 | 2247 | 1300 |
| 700×2200 | 640×2175 | 665×2175 | 804×2242 | 2247 | 1500 |
| 800×2200 | 740×2175 | 765×2175 | 904×2242 | 2247 | 1700 |
| 900×2200 | 840×2175 | 865×2175 | 1004×2242 | 2247 | 1900 |
Size chart for sliding door with two leaves:
| Sliding door size (width, height in mm) | Doorway size (width, height in mm) | External dimensions of the door block with trim (width, height in mm) | Height of fastening of the embedded beam from the finished floor in mm | Length of embedded beam in mm | |
|---|---|---|---|---|---|
| No frame | With frame | ||||
| 600+600×2000 | 1143×1975 | 1165×1975 | 1304×2042 | 2047 | 2500 |
| 700+700×2000 | 1343×1975 | 1365×1975 | 1504×2042 | 2047 | 2900 |
| 800+800×2000 | 1543×1975 | 1565×1975 | 1704×2042 | 2047 | 3300 |
| 900+900×2000 | 1743×1975 | 1765×1975 | 1904×2042 | 2047 | 3700 |
| 600+600×2100 | 1143×2075 | 1165×2075 | 1304×2142 | 2147 | 2500 |
| 700+700×2100 | 1343×2075 | 1365×2075 | 1504×2142 | 2147 | 2900 |
| 800+800×2100 | 1543×2075 | 1565×2075 | 1704×2142 | 2147 | 3300 |
| 900+900×2100 | 1743×2075 | 1765×2075 | 1904×2142 | 2147 | 3700 |
| 600+600×2200 | 1143×2175 | 1165×2175 | 1304×2242 | 2247 | 2500 |
| 700+700×2200 | 1343×2175 | 1365×2175 | 1504×2242 | 2247 | 2900 |
| 800+800×2200 | 1543×2175 | 1565×2175 | 1704×2242 | 2247 | 3300 |
| 900+900×2200 | 1743×2175 | 1765×2175 | 1904×2242 | 2247 | 3700 |
It is best to purchase the canvas ready-made. But if desired, you can make it yourself, for example, from laminated chipboard. However, a professionally made canvas with smooth, perfectly finished edges will look more aesthetically pleasing.
Prices for fittings for sliding doors
Sliding door fittings
Manufacturing of door leaf
If you decide, you will need one or two chipboard panels of the required size. As an example, we can take the following dimensions: a door opening edged with a frame of 765 × 1975 mm will require door dimensions of 800 × 2000 mm.

To lighten the weight of the door, it is recommended to cut out a rectangle or one or two squares in it, and later install glass or thinner plywood in it - according to the type panels.
- First, the canvas must be marked - at least 150 mm must be retreated from its edges.
- Next, the middle of the canvas is cut out using an electric jigsaw. To do this, a through hole is drilled in one of the corners of the marked figure into which a jigsaw file is inserted. Carefully, along the perimeter, the middle of the panel is cut out.
- It is not difficult to cut out the heavy part of the door; it is more difficult to give it a presentable appearance. To do this, you need to decorate the ends of the chipboard both around the perimeter of the door and inside the resulting frame with a special self-adhesive tape, which is fixed by heating it with an iron. When installing glass or decorated plywood, they are secured with beads well selected in size and color.
- Another option would be a door made of well-processed timber, fastened together with lintels made from a narrower timber, or from durable slats, between which glass or plywood is installed.

If it seems that it is easier to make a door from a block, then this is incorrect, since this requires not only high-quality, well-processed material, but also impeccable assembly. If at least one of these conditions is not met, the door frame may become deformed.

In addition, you need to have good carpentry equipment that will allow you to make precise cuts and ideally process the surface of the cut grooves, tenons, corners and other connecting nodes.
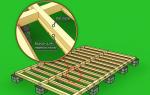
Installation of a suspended structure

The design of the sliding door suspension consists of the following elements:
1 – corner guide holders;
3 – carriage;
4 – threaded hanger;
5 – nut and locknut;
6 – door leaf;
7 – door leaf grippers;
8 – stopper.
After manufacturing or purchasing a door leaf, you need to attach to it all the elements of the system that must be installed on it. It must be remembered that glass, if it is intended for installation, is inserted last.
- To insert handles on the door leaf, holes are marked and cut out on both sides of the panel.
To accurately determine the location of the handles, 30 ÷ 50 mm are retreated from the edge of the door, and a vertical line is drawn using a corner.

A pen is applied to the resulting rectangle and outlined with a simple pencil. This way you can get the correct, even placement of the handle and round the edges of the rectangle to the desired radius.
The next step is drilling out the rounded edges. To do this, it will be necessary to take a round core drill of the required diameter, with which two holes are drilled on the sides of the marked shape.

The remaining wood between them can be removed using a chisel and hammer. This work must be done very carefully.
Having made two such holes, handles are glued into the door leaf on both sides.

- A hanging plate with a roller structure is fixed to the end part of the canvas. It should be noted that in different versions hanging plates may vary significantly. In some, as in this photo, the rollers are screwed to hanging plate. And in others they can be inserted from the side into a special groove. The hanging plate itself is screwed with self-tapping screws with press washers at a certain distance from the edge. Usually, the suspension system is accompanied by detailed installation instructions for a specific structure with specified parameters specifically for it.
- Next, the rollers are attached to the bottom of the door. This element of the system can also have a different design, so it is best to purchase guides and rollers as a set.
- After the necessary elements are installed on the door, you can proceed to installing the guide rails on which the rollers will run. The guides are attached to the floor and wall or just the wall, depending on the chosen system.

- In order for the lower part of the structure to be installed level and stable, a reliable support must be secured under it, which is most often buried in the surface of the finished floor, but sometimes also secured on top of the floor covering. In the latter case, a low threshold is formed. A perfectly flat board with the width of the bottom guide is used as a support. Holes for fastenings in the support board and in the floor is drilled through. The upper part is milled “under hide it"- this is necessary so that the head of the screw is completely recessed into the board. In the same way, it is necessary to prepare holes in the guide.

- A bottom rail is fixed on top of the support board, along which a roller installed at the lower end of the sliding door will run. The rail may have one or two tracks, depending on the door design.
- To prevent the door from jumping out of the rail, it is recommended to install a stopper in it.

The stopper is quite easy to install, the main thing is that it is selected to the desired width. It is pushed into the track of the rail. Spring-loaded, curved top plates rest against the top of the rail track.

A gap is formed between the upper plates of the stopper, and when the roller goes inside the track, it runs over one of the curved parts of the stopper, and then falls into the space formed between them. The second curved part of the stopper does not allow the roller to move further and go beyond the rail. Thus, the door leaf is fixed in one place.
Opening the compartment door is easy - just apply a little force in the opening direction, and the roller will pop out of the stopper gap, and the door will move freely along the guide.

- Next comes the installation of the top rail; it is usually secured to a beam previously screwed to the wall using anchors. To ensure that the upper guide is strictly located above the lower one, a plumb line is used for accurate measurements, and a building level is used for horizontal measurements.

The next step is to screw the top rail onto the beam with self-tapping screws, into which the door with the hanging system will be installed. It is also recommended to install a motion limiter in the top rail. It should be secured exactly above the lower stopper, above the part that secures the roller when it falls into the gap.
- In addition, the door kit often includes, which does not allow the door to remain open.
- For a quieter movement of the rollers in the metal structure of the rails, a rubber seal is fixed in them. It can be installed in either the top or bottom rail.
- After fixing the guide rails, the door is hung in a suspended structure. First, the upper rollers are inserted into the upper guide through the side hole, and then the door leaf needs to be raised slightly and the support rollers installed in the track of the lower rail.
- If there are two sashes, then first one of them is installed, and then the second, and then the movement limiter is screwed on.
- The last step is the installation of a camouflage box or platbands. These elements are screwed or nailed with decorative nails to the bar on which the suspended structure is attached.

In conclusion, I would like to remind you that the variety of designs of compartment doors is quite large. When purchasing, you should not select each element separately - it is best to purchase everything you need in a complete set and with the appropriate instructions. The kits are selected according to the thickness and width of the doors and doorway, so you first need to make or buy a canvas, and then select a hanging system with the required parameters.
Currently, the range of different door leaves is very wide, and you can choose the optimal one both in price and design. Therefore, it would still be better to buy a ready-made sash and select the appropriate kit for its installation. All that remains is to assemble and secure the entire sliding door structure in place.
Video: installing an interior sliding door
Components for it can be purchased at any specialized store. The principle of assembling such products is simple - the main thing is to strictly follow the instructions. So, we’ll tell you in detail how to make doors for a sliding wardrobe with your own hands
Required materials
Read also: Wardrobe on the balcony: what types are there, design, instructions on how to make it yourself (100+ Photos & Videos) + Reviews
Furniture stores offer ready-made systems for wardrobe doors from a variety of manufacturers. They differ only in configuration, installation methods and color design. However, the principle of their operation is identical.
There is no need to skimp on components. Steel or aluminum profiles must have perfectly adjusted geometry, roller mechanisms must function flawlessly, and fastenings must be made of durable metal. Otherwise, opening and closing doors will be problematic. And such a design will not last long.
Chipboard for filling a door will cost less than MDF. But when choosing this material, pay attention to its class and density. It is better to take an aluminum or acrylic (ABS) edge.
Preliminary calculations
Read also: We create a cozy workplace with our own hands: creatively, ergonomically and without harm to health (100 Photos & Videos)
Before you start purchasing material, you should determine what size your product will be. All types of profiles, including rail and support ones, are sold by the metre, which is very convenient. It is better to order cutting and processing of the edges of chipboard or MDF, as well as glass or mirrors for the internal filling of the door from a specialized company. Such work will cost a minimal amount, the parts will turn out perfectly smooth, and the likelihood of errors will be reduced to a minimum.
The height of the structure is easy to determine. To do this, you need to find out the height of the future cabinet and subtract 40-45 mm (the height of the profiles) from this figure.
Let's calculate the size of each of the sashes. You should not make them too wide - due to the heavy load on the rollers they will quickly fail. It is also worth taking into account the material of the door filling - the heavier it is, the narrower the doors should be made. Their optimal width is 50-80 cm. Since the sashes will not overlap each other, only the width of the vertical slats (1.3 cm) should be subtracted from the resulting width.
For convenience, it is better to enter the dimensions of each part in a table indicating their length, width and quantity. There are many programs on the Internet designed to accurately calculate sliding door systems.
You will only need to indicate the number of sections, the height and width of the opening, the planned number of sashes and the type of filling (chipboard, MDF or mirror). The program itself will calculate the number and size of components.
When choosing components, it is also necessary to determine the type of system:
- rail (support) structures: the roller is installed inside the guide, thanks to which the doors open smoothly, without effort; The running carriages cannot fall out
- hanging products: with upper or lower support rollers attached directly to the wall or ceiling; there are only clamps on the floor, and there is no lower guide, so you won’t have to trip over it anymore; externally, the absence of rails looks quite aesthetically pleasing - all the details are hidden inside the structure; but such products are less strong and durable; plus they are much more expensive
D Very closet can be replaced built-in doors. To make them, you will need the same components: guide rails, support profiles, rollers, etc. The main difference is that when opened, the door leaf will be hidden in a niche of the wall made of plasterboard or brick. It is better to purchase a cassette (pencil case) for such structures complete with other parts.
Component manufacturers
Read also: Partitions in the apartment: types, functional purpose, popular materials for arrangement (130+ Photos & Videos) + Reviews
Buying any components for assembling wardrobe doors today is not difficult. Just look at the price list of any specialized store.
Low-cost but good options for components include Slider-Volkhovets products, supplemented with Italian fittings, as well as guides, rollers and other wardrobe parts from companies "Hercules" And " Rollan". You can take a closer look at the products from the company "Framir"– they are quite durable and are made of aluminum profiles of the correct geometry.
The leading manufacturers of components for sliding wardrobes include the following companies:
- Absolute: provide consumers with high-strength, lightweight structures; Four types of profiles are available, with different shapes and finishes; another significant advantage of such products is ease of installation;
- Divendoor: fairly inexpensive elegant components made of steel in bronze, silver, gold, wood;
- Stanley: reliable products, almost ideal in their performance characteristics;
- Raumplus: German quality at very affordable prices; The warranty covers all components, down to the last screw;
- Komandor: another good tandem of quality and durability; warranty up to 30 years;
- Ramtrack: in the world market, products from Canada are the standard of quality; This company was no exception; their steel products with durable anti-corrosion coating can be called a quality standard in all respects
Components for sliding wardrobes from the following companies are less known on the Russian market, but this in no way affects their quality:
- Geze Rollan: silent rollers, durable profile, long warranty; but these products, unfortunately, cost a lot
- Ducase: the manufacturer claims that their components can last up to 27 years, with 100 thousand opening-closing cycles; however, the warranty for such products is only 12 months
- Laredo: the price-quality ratio is almost ideal, and they look very decent
Cutting guides
There are no special instructions for cutting guides for sliding wardrobe doors. In order not to damage the decorative coating, when cutting you only need to turn them over with the back side up.
The manufacturer advises cutting aluminum products with a pendulum saw with a special wheel. However, you should only buy expensive equipment if you assemble furniture professionally.
To cut the profile, you can use a regular grinder with a metal disc or a circular saw. A regular hacksaw for metal gives a fairly even cut. If there is a large gap in the miter box, you can place appropriately sized plates of durable material into it.
The length of the cut guides should be such that the strip fits freely between the walls. To prevent the future product from warping, all cuts are made strictly at 90°. Next, the cut area is sanded with emery cloth.
Door assembly
Read also: Shelves in the garage: order comes first. General design issues, simple options, step-by-step instructions for making your own (75+ Photos & Videos) + Reviews
Installing a wardrobe door is quite simple. If all the measurements and calculations are made correctly, in fact, all you have to do is assemble all the components and parts into a single whole.
- Installation of guides is perhaps the most critical stage of work. Not only the service life of the future product, but also the ease of opening and closing depends on their correct installation.
- The simplest version of guides are single-strip products. A single sash will move along such guides, opening half of the opening. In two-way products, two or three leaves move at once, and in three-way products – up to six leaves
- Assembly begins with the installation of the upper profile. If you need to attach a profile directly to concrete, holes are prepared in it using a hammer drill. To strengthen it, it is better to place a chipboard lining under the profile.
- To install the guides, you can also attach a transitional wooden beam to the ceiling. For single-leaf guides you will need a beam equal in width to twice the width of the opening
- Next, the rollers are attached. To do this, you just need to “bring” them inside the profile
The holes must have different diameters
For it you will need to take 2 vertical and horizontal profiles. The horizontal ones should be equal in width to the sash itself. Vertical products can have symmetrical (designated “C”) or asymmetrical (“H”) fastening.
To assemble the frame, the profiles must be laid out on the floor in the form of a frame. You also need to “try on” the lower and upper rollers for it.
We measure the height of the frame along with the rollers and, if necessary, cut the profile strictly at a right angle
We drill through holes to connect the parts. When drilling them, please note that the lower ones are made smaller. For example, 4 and 6 mm (their exact size depends on the type of specific fastener)
4 7
The filler (MDF or fiberboard) is attached inside the frame very simply. To do this, it is enough to apply a little force or lightly tap the material on the back side so that it fits into the grooves until it stops.
When inserting glass or a mirror, a sealing rubber must be attached - it is put on the ends. The seal must be positioned without overlap
To prevent the glass or mirror from breaking, do not forget to attach a protective lash to the back side. In this case, if damaged, the fragments will not scatter, and the likelihood of injury will be minimal.
The handle profiles must fit into the grooves until they stop.
The frame is ready. All that remains is to “try it on”
Learn more about assembling the frame for the wardrobe in the video below.
- After assembling the frame and installing the rollers, you need to perfectly adjust the bottom guide. You can do this in two ways at once
- To accurately determine the location of the lower guide, we use a plumb line - a weight on a cord attached to the upper guide. Mark the line with a pencil or marker. We retreat from it 20-22 mm deep into the future cabinet and attach the bottom bar
- At first it is only “baited”. The final fastening is carried out only after checking the functionality of the structure and the ease of sliding of the door. If the door movement does not suit you, you should double-check the vertical alignment of the rails and the dimensions of the structure
- If you have an assistant, you can immediately hang the door leaf and set it strictly vertically using a level, and then simply mark the location of the lower profile. To do this, we lay the lower profile without fastening it, fix the frame to the upper and lower profile (it is not necessary to fasten all the sashes, the side ones are enough). Now we take the building level in our hands and begin to level the frame. If you are sure that it is installed correctly, draw a line where the lower guide is attached
- Next, the door is removed, and the lower profile is mounted to the floor
- You do not need to use any self-tapping screws or bolts to secure the single-strip bottom rail. Although many instructions recommend the use of fasteners, we do not recommend using them. After all, if one of these bolts gets slightly unscrewed one day, the door will simply stop
- To attach the lower profile, double-sided tape or silicone sealant is sufficient. Only in two- or three-strip profiles additional screws are screwed into the center
- It is better to install a chipboard lining under the bottom guide. It is screwed in with screws so that the caps are slightly buried in the wood. They are fastened in increments of 20-30 cm in a checkerboard pattern.
- When inserting the door, be extremely careful and careful. While your product is not yet fully assembled, there is a high probability that you will accidentally break the fasteners
- After installing the door, sealing brushes are glued to it. They serve as protection against dust and soften the ride.
- Decorative plugs must be installed on all holes made in the profile.
If you are planning to renovate your apartment, you are probably faced with choosing the type of interior doors. Sliding doors are increasingly used in apartments, although previously this was considered an office style. Despite the fact that installing this type of door is a little more complicated, the task is still doable, you just need to first understand the existing nuances and follow all the recommendations and instructions.
Types of sliding doors
All sliding doors can be divided into 2 types:
In turn, compartment doors that go into the wall are divided into:

To install the structure, you will need:

- Tools: screwdriver, hammer drill - if you are planning a more complex repair involving removing the inside of the wall for a doorway, screwdriver, tape measure, level, pencil.
- Fastening elements and fittings are supplied when purchasing doors, but can also be purchased separately.
- Door leaf, extensions, platbands, frame.
- A wooden beam 5 X 5 cm in cross-section - in case you will install a door moving along the wall, as well as anchors for fastening it, self-tapping screws.
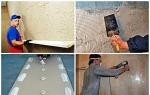
Those who have ever done renovations know that before installing interior doors, it is advisable to carry out all the necessary stages of wall finishing work (leveling, puttying). If you want to install doors that slide into the wall, then the sliding system should be installed before finishing. In other cases, the installation of the structure is carried out after the final finishing of the walls, when the final repairs are completed.
Before installing the door, it is important to make sure that the floor and the top side of the opening are parallel and strictly horizontal, otherwise the doors will roll out spontaneously.

It is better to take all measurements in several places. For example, the height needs to be measured on the left, right and middle. Measure the width in the same way. The more accurate the measurement, the fewer problems there will be during installation.
Stages of installing compartment doors
- Installation of the box.
Installation of the frame is the first thing you need to start with when installing interior doors. It is necessary to install, align, and secure the door frame with screws.

- Installation of the upper guides.
Having moved the door leaf to the opening, it is necessary to mark the upper level of the door. Then, using a level, draw a horizontal line 7 cm above the set mark - this is where the guide rail will be located. We apply the timber to the wall and secure it with anchors along the mark. After this, you need to screw the guide to the beam (to its lower end), making sure that it is positioned strictly in a straight line.

- installation of carriages with rollers in the guides. It is necessary to insert each carriage into the guide and make sure that it moves easily. Running stops (rubber shock absorbers) must also be installed along the edge of the rail.

If you decide to install an additional lower fastening, which gives greater stability to the structure, then you need to consider several fastening options:


- Installation of the door leaf.

First you need to hook the door leaf behind the decorative strips. After this, you need to install it on the upper rollers and then on the lower ones. This completes the installation. You can check the quality of installation - whether the sashes roll easily and smoothly, whether they are securely fastened.
- Installation of door handles, trims, which are nailed or glued to the upper beam and to the racks to which the compartment adjoins in the closed position.
When choosing sliding doors, it is also necessary to take into account some disadvantages, such as low noise insulation, less strength compared to conventional drop-down doors, which means that over time, additional structural repairs may be necessary. Perhaps for some this will not be an obstacle in choosing a sliding door, since the main advantages - space saving, safety, ease of opening and others - cover the existing disadvantages.
How to assemble and install a sliding door with your own hands, what are the features and advantages of sliding systems - detailed instructions on assembly and installation.
Installing a sliding door with your own hands: step-by-step summary
If you decide to change the standard opening design to a sliding system, you need to know everything about how to install a sliding door with your own hands. First, familiarize yourself with the features of such a mechanism in order to better understand the principle of implementation of subsequent work.
Sliding doors are a good solution for saving space
Features and advantages of sliding systems
To know how to correctly install an interior sliding door with your own hands, you need to understand how such a system works. The main structure consists of a guide rail and rollers that are attached to the end of the blade. Travel limiters are installed along the edges. In this way, the canvas is suspended above the floor, which provides it with free movement. In cheaper and older models, an additional roller for the bottom end and floor guide rails are used. But why are sliding systems so popular?

The design and main elements of the door - coupe
Advantages of interior compartment systems:
- normal installation - because it’s painfully easy to install the door yourself;
- saving space - the so-called dead zone required for plowing is removed;
- Comparably affordable price;
- wide range of models;
- ease of construction;
- decorativeness and modernity.
But, it should be taken into account that such doors cannot provide sound insulation at an impeccable level.
Preparation for work
Before installing sliding compartment doors with your own hands, you need to prepare all the materials and necessary tools. To complete the work you will need:
- door leaf;
- platbands;
- wood beams with a cross section of 50 mm;
- guide;
- false panel;
- stoppers and other fittings.
Pay attention: there must be sufficient clearance between the trim and the canvas so that they do not rub against each other.

Correct operation doors- the compartment depends on the accuracy of the doorway measurements taken at the beginning
To quickly and efficiently assemble a door with your own hands, you will need the following tools:
Installation of a Sliding Door interior doors
Installation Sliding Door interior doors Read more about the products of the Framir door factory...
Interior DIY compartment doors
Even more articles on stroy-land.net.
But for the canvas to become completely insufficient to simply put it on rollers. To do this, you need to calculate its dimensions and height from the floor. How to calculate the required size of a compartment door? To do this, measure the clearance and add approximately 5 cm to the acquired figures. The door should be wider on both sides and higher in height by this amount in order to close it completely. To calculate the length of the guide, you need to multiply the width of the door by two.
After all preliminary work has been completed, installation can begin.
Installation of guides
Do-it-yourself installation of interior compartment doors begins with the design of the opening itself. The slopes can be leveled and plastered, painted or covered with wallpaper. But it’s best to put a decorative box. It is often made from MDF. First, you need to assemble it in a horizontal position. If the planks are very long, carefully cut them with a jigsaw. Then insert the frame into the doorway and level it, securing it with wood pegs and spacers. After the initial installation of the panels has been carried out, you can take up the guides.
Do-it-yourself installation of interior compartment door guides, step-by-step summary:
- Cut the timber to the required length. Its length must match the size of the guide.
- Using screws, screw the iron guide to the beam from the bottom end.
- Set the level and secure the structure at the desired height above the gap. The middle of the strip should be placed on the edge of the opening on the side where the door will open.
Hanging the canvas
Before you completely assemble the compartment door leaf with your own hands, make sure that it matches the height and width of the opening. At this step, the rollers are installed and the canvas is hung on the guides.

The door leaf is driven by a sliding mechanism
How to assemble compartment doors with your own hands, step-by-step summary:
- On top of the blade at the end, drill one hole on each side for the upcoming installation of rollers. To do this, use the pen attachment.
- Screw the two iron base plates with screws.
- Insert the rollers into the hole in the plates and the canvas, placing them under the guide rails. Screw the rollers to the desired height.
- Align the canvas vertically and, lifting it slightly, place it under the guide. The wheels must be parallel in order to ride freely on the rail.
If all levels are set, you can fill the connections between the box and the wall with foam. Do-it-yourself door assembly does not end here, because it is necessary to install auxiliary fittings.
Stoppers and seals
First, you need to install stoppers for compartment doors yourself. To do this, move the blade to the open position and set the limit at a suitable level. A motion limiter is inserted along both edges of the guide rail and screwed into the support. Decorative caps are placed along the edges.

Seals must be installed on the sliding door
From below you need to assemble one more part - the flag roller. Doing this with your own hands is painfully easy. It is enough to screw it to the floor in such a way that it fits into the groove in the lower end of the canvas. The roller protects it from lateral vibrations during movement.
Next step - installation pens. For compartment doors, only mortise models are used. You need to make a recess in the canvas to fit the size of the handle, screw the base and insert a decorative trim.
The last touch is gluing the seals, if required. Do-it-yourself installation of compartment doors is complete. Now you understand how to quickly and without mistakes install an interior sliding door with your own hands.
To protect one space from another, doors were invented. Many designs presented on the market today can satisfy the needs of anyone, even the most demanding buyer. But there are designs that have not given up their leading positions for a long time. These include sliding doors. You can install such doors with your own hands, the main thing is to study their features, types and installation methods.


Peculiarities
Sliding doors are sliding structures that have their own characteristics that need to be studied before you begin installing the doors yourself.
Sliding doors have a simple design consisting of a door leaf, a roller mechanism and guides. The door leaf moves with the help of rollers along a profile in which stoppers are installed on each side, limiting the movement of the doors to set points.
Without a doubt, this design is in great demand, as it has advantages over swing doors.


Due to the way it is fastened, the door leaf always moves parallel to the wall, and some models roll back into the built-in niche, so there is no dead zone in the corner. Any room with sliding doors installed is visually perceived as more spacious than with hinged structures.
A compartment-type door will not simply open from a sudden gust of draft and it is impossible for it to accidentally pinch a finger, which is important for families with young children.


The design of door panels is very diverse. You can buy a ready-made canvas, or you can make it yourself. A homemade design will look no worse than a purchased copy. And installation of sliding doors is not difficult. If desired, if you have the necessary tools and correctly taken measurements, even a non-professional can handle it.


Kinds
There is a classification of sliding doors, thanks to which they are divided into different types. The classification depends on the location and method of installation, design and number of door leaves.
Sliding doors are used in different places. They are installed in doorways in the kitchen, room, toilet or bathroom. With their help, they enclose space, separating one area from another.
Sliding doors are mounted in niches, using this space for storing things.


Most often, sliding doors at home are installed between two rooms. They can move along the wall and have an open design, or they can be built into a niche and, when opened, completely disappear inside it. The hidden design requires the installation of a frame and other significant repairs that are carried out before installing the door.


The compartment door is also used in closets. Furniture designs have their own specifics. As a rule, such a door moves along two guides and has two pairs of rollers. Some are located at the bottom of the door leaf, and others at the top. Interior compartment doors, unlike furniture options, most often have one guide – the top one. In this design, it performs two functions: holding the door leaf and ensuring movement.


You can install any design in the dressing room. It all depends on the area of the enclosed space and the desires of the owners. The surface of the door leaf in the dressing room is usually mirrored.
Very often, a dressing room or wardrobe may have an irregular shape. Then doors having a non-standard radius shape are installed. Radius doors are characterized by smooth corners and a unique curvature of the door leaf. The fixation and movement of unusual doors is carried out along two guides that have the same curved shape and are installed both in the upper and lower parts.


Materials
To make sliding doors with your own hands, you need to purchase the appropriate materials and select the design of the door leaf, which can be solid (panel) or paneled, consisting of different materials and supported by a frame.
To make the canvas, you can use solid wood. The choice of breed depends on your preferences. Pine is most often used, and the surface is covered with veneer from more valuable species. Both solid canvas and panels of the most varied shapes are made from solid wood. You can also use wood as a frame.
When working with solid wood, not only accuracy and precision are required, but also quite a lot of experience.


A good alternative to solid wood is plywood, which has many advantages. Unlike solid wood, it is much easier to work with. It bends, and therefore giving it the desired shape is not difficult. Plywood doors are resistant to temperature changes, exposure to sunlight, moisture, and synthetic detergents. Practical and wear-resistant plywood is often used to make door panels not only because of its positive qualities, but also because of its reasonable price.


Slightly lower in cost are chipboard slabs, which are also used to make door panels. The surface of this material can be covered with film or veneer. When working with chipboard, it is necessary to remember that the edge must always be closed, regardless of whether a solid piece will be used to make a door or panel or not. The disadvantage of this material is the presence of harmful resins, which are released into the surrounding space when exposed to certain factors.


Glass is also used as a material for making door panels. It can be used as a single piece or as inserts in combination with panels made from other materials. The surface of glass panels can be decorated with sandblasting, photo printing or engraving.
Instead of glass, you can use lightweight and durable polycarbonate to make the door leaf. Doors made from it are flexible, and therefore they are often the basis of radius structures. This material is fire-resistant and has a fairly long service life.
A mirror is also used as a door leaf, installed either as a separate leaf or in combination with other materials.


How to calculate sizes?
Correct installation requires thorough preparation, which includes proper measurement of the opening. The dimensions of the canvas, installation method and the number of canvases will depend on the results obtained.
Measurement should start from the height of the opening. Dimensions are taken at several points in increments of approximately 70 cm. As a rule, measurements are taken in the center of the opening, as well as on the left and right sides. The height difference should be no more than 15 mm. The minimum value is taken as the main value.


The width is also measured at several points. Here the main value is the maximum value. The difference should be no more than 20 mm. Similarly, you need to measure the depth of the opening. This value is necessary when decorating the opening with a box.
If the width of the doorway does not exceed 110 cm, then, as a rule, one door leaf will be required, but if it is larger, then two doors will have to be installed. The optimal width of the door leaf is in the range of 55-90 cm. Its dimensions should exceed the size of the opening by 50-70 mm.


In addition to measuring the height, width and depth of the opening, you need to determine the distance from the opening to the corners (with an open installation method). This measurement is necessary to understand whether there will be enough space when the door leaf is pulled back.
The height of the door leaf depends not only on the height of the opening, but also on the method of installing the mechanism. It can be attached to a beam or a special profile. A profile or beam with a compartment mechanism is attached directly above the opening or to the ceiling surface. The height of the door leaf also depends on the location of the bottom guide and the presence or absence of rollers at the bottom of the door leaf.

How to do it at home?
In order to make a door structure with your own hands, you must first decide on the door material and its design.
If you plan to use glass or plastic as a canvas, then it is better to order a ready-made sash, since it will be quite difficult to prepare these materials yourself. Handles and profile frames must be purchased according to the size of the door leaf. Both materials are best suited for installation in the bathroom.


The easiest way is to make your own door leaf from untreated MDF board or natural wood. To do this, you will need a number of tools: a miter saw, a drill, a router (for grooves). You will also need to purchase additional materials: varnish, trim tape, PVC film or veneer to cover the surface, sandpaper if you don’t have a sanding machine. If desired, you can order a finished canvas of the desired size.


First, the canvas is cut to the desired size, and then the ends are sanded. Afterwards, you can cut out a hole for the handle, after making a mark on the canvas. If you plan to install a suspension system, then you need to make a groove in the lower part of the canvas, and make marks for the roller mechanism in the upper part and drill holes.
Now you need to clean the door leaf from dust. If the work is carried out with wood, then the surface is first treated with impregnation against rotting, and only then varnished. If the material being processed is MDF, then a film or veneer is applied to its surface, which can be varnished if desired.


Tape is used to process the ends. On its inner surface there is a special composition that is activated when heated. It must be applied to the outer ends and ironed along the entire perimeter. Remains of glue are removed using sandpaper.
For the combined filling of the door leaf, you can use a combination of a variety of materials. In order to put all the parts together, you will need special profiles, which can be purchased at any hardware store. In addition, you will need handle profiles.


Horizontal profiles designed to hold inserts are cut according to the width of the blade, taking into account the width of the handle. Now you can start assembling the canvas from the inserts. If they use glass or a mirror, then it is necessary to purchase a silicone sealant used to protect the ends. It is advisable to apply a special film to the inside of the mirror. If the mirror surface breaks, it will prevent the fragments from scattering in different directions.


In order to attach the handle, you need to make holes in the upper and lower parts of the handle to the inserts. Two through holes are drilled in the top, and 4 holes are drilled in the bottom. The diameter of the holes located on the surface of the handle must be greater than the diameter of the holes located under them. In the upper part of the handle, holes are drilled with an indentation of 7 mm. At the bottom, the first pair is drilled with the same indentation, and the second pair should be located at least 42 mm from the edge.


Now you can start assembling the canvas. The prepared canvases are inserted into the profiles. To do this, we install the canvas with its end, apply the profile to it and, using a mallet, gently tapping, insert the canvas into the groove of the profile. We do the same with the rest of the profiles.
Before installing the door leaf between the rooms, you need to install the frame, extensions (if the frame is narrower than the opening) and prepare the trim. It is better to install them after installing the door. The structure itself is mounted above the doorway with fastening to the wall.


In a plasterboard wall, the installation of the canvas is carried out on a metal frame, which must be installed at the repair stage. First, the frame is installed, then the door is mounted, and only then comes the plasterboard covering.
Despite the fact that compartment door systems have some differences, the principle of operation and installation remain approximately the same. Therefore, the step-by-step installation instructions look almost the same for both a suspended system and a system with a lower support.
To install the door leaf you will need a wooden beam. Its length should be 4 times the width of the canvas. This is necessary for the doors to move freely in different directions.


Door installation begins with fastening a beam or a special profile. A rail pre-prepared to size is attached to the beam using self-tapping screws. This prepared structure can be attached either to the wall, to the ceiling, or to a metal frame. The mounting method depends on the installation location. When installing a door in a niche, the beam is attached to the ceiling, in the partition it is fixed to the frame, and the wall mounting method is suitable for interior doorways.


To properly fix it on the wall, the canvas is first placed in the opening and a mark is made, an indentation is made from it upward by 7 cm and a horizontal line is drawn. The prepared beam is screwed using self-tapping screws to the wall strictly horizontally relative to the opening. You can check the position of the beam with the profile using a building level.
The prepared web with rollers is inserted into the rail. The ends of the profile are covered with rubber shock absorbers. In order for the door to move exactly along a precisely specified path, a flag stopper is installed on the floor.
The open system that allows the door to move can be covered with a decorative panel.

To install a sliding door with a lower support, in addition to the upper guide, a lower profile is installed. The stoppers in this case are located in the lower profile. To install the door, you must first insert the upper part of the leaf into the upper guide, and then, pressing the lower rollers, install the lower part of the leaf on the rail.

Accessories
Today, there is a huge selection of components for installing a sliding door with your own hands.
To install a system with a lower support, you need to purchase a set of guides and rollers corresponding to the weight and thickness of the sashes being installed, handles, a pair of stoppers for each leaf installed in the grooves of the lower guide, and, if desired, you can purchase closers.
For the hanging system, it is enough to select the top guide, a pair of rollers installed at different ends of the canvas, a pair of flag stops and handles for the sashes.

There are some differences between parts intended for suspension and support systems. The upper guide of the suspension system, as a rule, is made in the shape of the letter “P” and contributes not only to the sliding of the canvas, but also supports it in weight. It bears the main load.
As a rule, the material of manufacture is aluminum, but there are tube-shaped models made of steel. It is not customary to cover the top track in the form of a pipe with a false panel; their shape and appearance are an additional decor for the room.


In the support system, the upper guide has the shape of a double letter “U” and does not bear the main load. Its function is to maintain the sash in a vertical position. The main load in the support system falls on the lower guide. This profile has two parallel grooves designed for moving rollers.
Each system has its own sets of rollers and stoppers.


Successful examples in the interior
Sliding doors are a universal solution for any room. With their help, you can turn any niche into a comfortable and very functional dressing room. Thanks to them, a large opening looks simply magnificent; you cannot achieve this effect with a swing door. Not a single built-in wardrobe can do without them. Sliding doors help to beautifully and effectively separate one room from another.